Website performance is amongst the most important factors on your website that you should always pay close attention to. That is why it is imperative that you are always running your website on the best practices to speed up your site and deliver the best experience possible for your users.
By offering a steady and fast website you will provide valuable information to your users in no time, you will be able to reduce the bounce rate and this will signal Google that your website contains content that is worth being ranked high on its search engine. You can read extensive guides on how to increase the performance of your website and make your website run faster, or choose the fastest WordPress theme to make your website run faster.
One good secret that not many WordPress users know about is WordPress transients. Since its 2.8. update WordPress has supported Transients API that allows you to store key-value pairs of data with an expiration time. The best way to increase the performance of your website and make your site run faster is by caching content that is saved on the server and it’s displayed a saved copy of the content to the users. This makes the website run faster because it does not require calling the request to display that particular page, instead it shows a saved copy of it.
This is why caching plugins are of the essence when it comes to building a strong and powerful WordPress website. But for this tutorial, we will show you another approach to cache content that is proven to provide exceptional results, and what best of this method is that the content is cached on your WordPress databases. We will show what WordPress transients are, how they work, and how to use them on your WordPress website to increase speed and performance.
What are WordPress Transients?
In WordPress, we are familiar with the context of caching full pages, this means an entire web page is saved and stored just before it is being sent to a visitor, and when the next visitor requests the same page, they will get the stored version of the web page without your server having to rebuild it. This is the logic behind caching plugins and why they work wonders on your site’s performance.
However, there is also another content of caching parts of a web page, not entire web pages. Usually, these parts are content that is harder to retrieve like slow results from remote servers (such as Facebook or Twitter results), or large database queries which are likely to slow down the server, thus providing a longer loading time.
This is where transients come into play, as they are a type of cached data where you can store a hunk of data and get them back quickly. Transients API are used to partially cache pages, one data object at a time. What’s intrinsic about transients is that they always have an expiration date and they become unavailable. If you try to call that transient you will receive a failed message because the cached data will be deleted. A WordPress transient will consist of these three parameters:
- The transient name (Required) – This must be a string to identify the transient. It can not be longer than 40 characters, otherwise, it will fail to create the transient.
- The transient value (Required) – It can be a number, an object, an array, or a string that provides information retrieved by the API
- Expiration Seconds (Optional) – The seconds in which the transient will expire, this defines the period on which the transient is valid.
If you don’t provide an expiration time or value expressed in seconds, or if you simply put the value “0”, the transient will never expire. It is good practice for a transient to have an expiration time and also delete expired transients.
The difference between Options API vs Transients API
WordPress developers are aware of the existence of Options API as they are a standardized way of storing data in the database. They allow you to store key-value pairs of data permanently in the WordPress database.
Options API are stored data that are meant to be saved on the database and you can either change or update them. All the data is stored in the wp_options table and is given a custom name. On the other hand, WordPress transients are very similar to Options API but with a distinctive feature, which is the expiration time.
This added feature simplifies the process of storing and caching temporary data and information. The main difference between Options API and WordPress Transients API is that Options API is used for storing important data permanently, meanwhile, Transients API is used for storing data temporarily and due to their non-persistent nature, this is why they should not be used to store critical data.
Note that WordPress transients will inherently speed up your website when combined with a cached plugin because they would make the WordPress transient values be stored in fast memory instead of the database. For this reason, WordPress transients should be used to store any type of data that is expected to expire. You need to make sure that any data you’re saving in a transient needs to be shown again to multiple users over time.
When to use WordPress Transients?
WordPress transients are used to speed up your website and increase the performance to provide only the best user experience for your visitors. Most commonly, transients are used for resource-intensive queries. If you have a lot of visitors on your website that require the same resource, that can put a lot of pressure on your site’s server thus lacking in the ability to display the query at a high speed.
If you are using WordPress transients this means you can temporarily save those highly required data without having the server recreate the content each time a user requires it. What the best thing about transients is that after they exceed the expiration date (sometimes even sooner), they expire automatically. So every time a user tries to retrieve an expired transient, WordPress will delete it, in this way avoiding any clutter. At the same time, it will recreate a new transient, ensuring your fresh content from remote APIs.
Transients are used to store any type of data or information that is too complex and takes a long time to load, but this data will be deleted, that is why it is advisable to be used for the type of content that is always recreated. Such examples would be to display the number of visitors, tweets, or data from an external source.
Additionally, transients are best reserved when dealing with large data queries and remote calls. As a rule of thumb if it takes more code to create the transient and make a fresh request for the resource each time it’s needed, then you are better off without transients.
How to Create, Retrieve, and Delete Transients?
While WordPress transients are great for caching data or information for a certain period of time, there are six functions you can perform using transients, first, you will need to save the transient. We will be delivering a more detailed explanation of the three main functions of WordPress transients which are to create, retrieve and delete a transient. Let’s see the main functions of a WordPress transient:
- set_transient( $transient_name, $value, $timeframe )
- set_site_transient( $transient_name, $value, $timeframe )
- get_transient( $transient_name )
- get_site_transient( $transient_name )
- delete_transient( $transient_name )
- delete_site_transient( $transient_name )
As mentioned above, in this article we will focus on the set_transient, get_transient, and delete_transient. The reason to do this is that the site variations do the same thing, the only difference is that they are used to create, retrieve, or delete transients on a site-wide WordPress Multisite environment. Another difference is that the set_site_transient variation is always auto-loaded whether or not you set an expiration time.
How to Create a Transient
To create a transient we use the set_transient function. The function takes the three mentioned parameters like the name, the value, and the expiration date. To create a transient you must use the following syntax:
set_transient( $transient, $value, $expiration );
How to Retrieve a Transient
Besides creating a transient you can also retrieve it. To retrieve a stored transient you will need to use the get_transient function. Different from creating a transient, this function only needs one parameter which is the name of the transient. You can retrieve a transient using the following syntax:
get_transient ( $transient );
Remember to change the value of the transient name to an actual transient you have stored. The get_transient function will return false if the transient in mention has expired or does not exist. Otherwise, it will return the value of the transient in mention. If you have set a transient using the set_site_transient function then you will need to retrieve it using the get_site_transient instead of the get_transient function.
How to Delete a Transient
Next up you can also delete a transient using the delete_transient function. This function uses only one parameter similar to retrieving a transient, which is the name of the transient. To delete a WordPress transient you should use the following syntax:
delete_transient ( $transient );
Remember to change the name parameter to the transient in mention. If the transient returns true, this means you’ve successfully deleted the transient. If the transient returns false, this means the WordPress transient could not be found some any sort of reason. Similar to retrieving the transient, if you are using the set_site_transient function you must also use the delete_site_transient to delete a transient instead of delete_transient.
How to Manage Transients in WordPress?
Throughout the article, we’ve discussed what transients are and how to use them in WordPress as well as how to perform the main functions to save, fetch and delete them. This still might be a complicated process, as using transients is not as simple as it might sound, especially for WordPress novices who are still getting the hang of it. This might seem a lot. Yet, just like everything else in WordPress, transients too are made simple by using a plugin.
Additionally, if you wish to use WordPress transients on your website because they will increase the performance of our website and have it load faster without bulking it to the extreme, then we introduce you to the Transient Manager plugin. A highly capable and powerful WordPress plugin that allows you to manage, view, search, edit, and delete transients as per your desire. First things first, just like with any other WordPress plugin, make sure to install it and activate it from the WordPress dashboard.
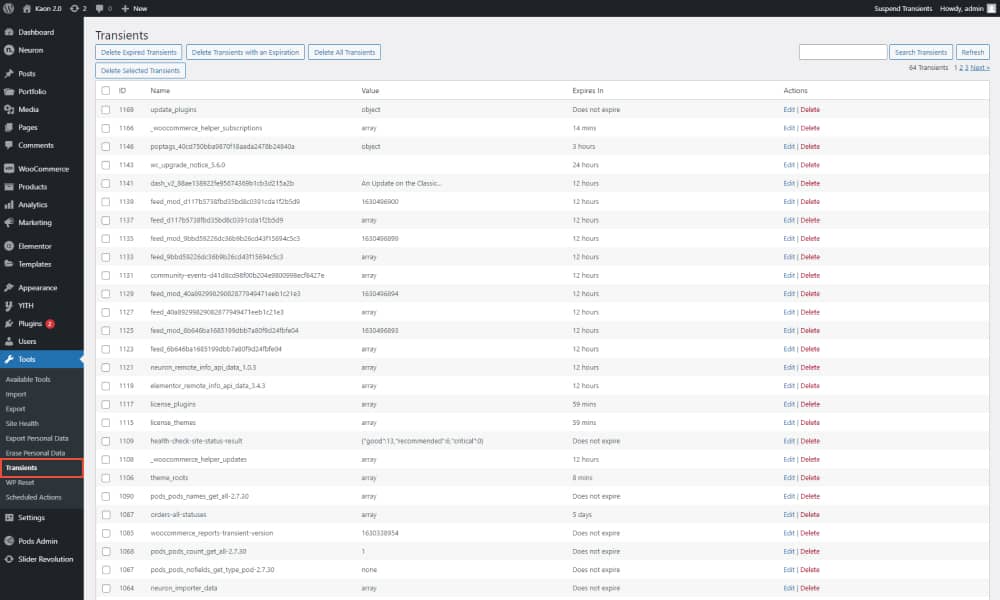
Once the plugin has been activated, you can locate it under the WP Dashboard, Tools >Transients, this is where you can manage all your transients from one interface. Here you can find all the transients you’ve created alongside their name, values, and expiration dates.

The plugin will give you the power to perform actions including editing, or deleting them. You can bulk
- Delete expired transients
- Delete all transients with an expiration date
- Delete all transients
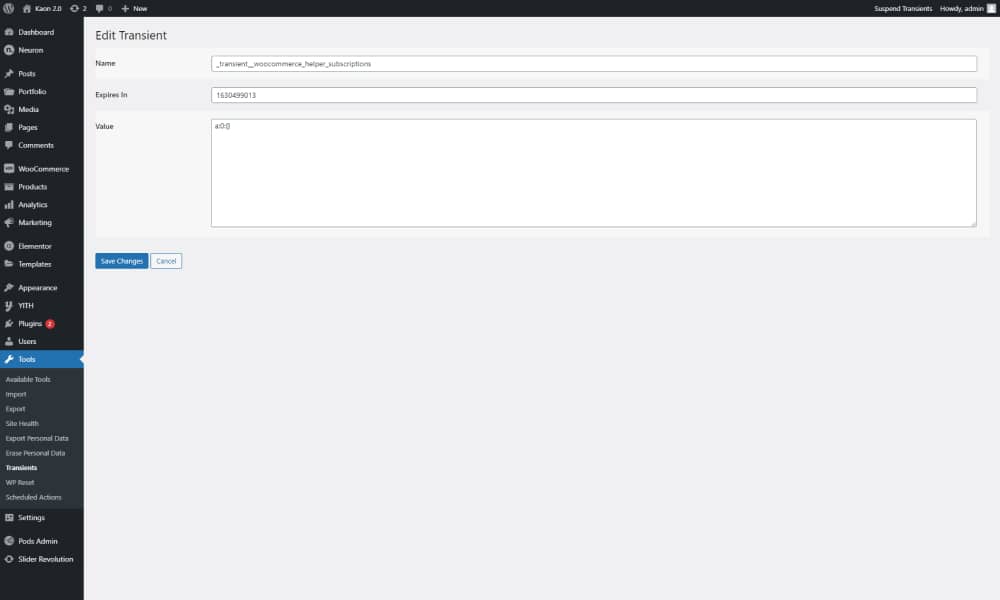
Keep in mind that is always a good idea to delete expired transients. To edit a transient click on the Edit button on the left and you will be able to configure the main parameters.

Here you can edit the transient’s name, the expiration date, as well as add their value. This setting comes in handy if you wish to test a theme or plugin and check it with different transient values.
Final Thoughts
Throughout the entire article, we laid down all the most useful knowledge on WordPress transients. What are WordPress transients and how to use them on your WordPress website? We’ve also discussed the main difference between Transients API and Options API. WordPress transients are used for storing data or information to provide your users a super-fast loading website that performs on excellent grounds.
Keep in mind that transients are used for storing data that you are cool with deleting because after their expiration date ceases they will no longer be made available. For permanent data storage, you should use Options API.
Although they might seem complicated, once you get the hang of it you will start to notice the benefits you have if you properly use WordPress transients and your website will thank you for it. We hope this article helped you shed a light on WordPress transients and how to use them. Leave in the comments below your best tips on transients.


