WordPress is one of the most popular content management systems that is widely known for its beginner-friendly interface and the level of customizability you can make on your website. In WordPress you can customize entirely your website and appeal to your brand on every little component, depending on the theme you use and its customizability.
WordPress has expanded its reach as being the publishing platform for a wide range of niche websites, starting from blogs, online portfolios, as well as highly capable online stores where you can sell both physical and digital products, as well as manage and take care of shipping, inventory, and revenue. You can also pair it with all the most popular tools online or try an entirely intuitive building experience using drag & drop page builder to create the most beautiful and capable websites.
On the list of WordPress customizability, we also have the option to add custom scrollbars to your WordPress website. If you are someone who pays a lot of attention to details, then we know coherence is the main concern on your website, where even the smallest particulars are important.
That’s the matter with scrollbars, as they present a quite default and dull design, but you can change it and add custom scrollbar to your WordPress website with ease. For this article, we’ve included a comprehensive tutorial on how to add custom scrollbars in WordPress, where you can either achieve the results using a plugin or by inserting custom CSS on your site.
Two approaches to add custom scrollbar in WordPress
This article is written on the subject of how to add custom scrollbars on your WordPress website, and to approach this mission, we’ve included two methods, one is using the help of a plugin because WordPress is a large repository of plugins and themes that increase the functionality and provide a beautiful design for your website. And the next method includes adding custom CSS, which if you’ve never dealt with code before can be a little frightening, but not at all that complicated, just simply follow our tutorial step by step and you should have nothing to worry about.
If you choose to go down the plugin path to add custom scrollbar to your website, you must know that this is the easiest and the most effective way to finish the job. Using a WordPress plugin will eliminate the need to deal with code whatsoever, which is reassuring and comforting for a WordPress novice. Yet, on the other hand, the use of too many plugins has proven to take precious seconds from your site’s loading time and that will harm your website’s performance in many aspects.
We also have the custom CSS code approach. If website performance is of vital importance and you want to keep your website as lightweight as possible, then you might opt for a more developer-friendly approach like adding custom CSS to your website. We will provide the code for you and you can easily change the appearance of your site’s scrollbar in a few simple steps.
But, just like everything else in life, nothing is perfect, except for our charming Kaon WordPress theme, but that’s not the subject here. Before you decide to add custom scrollbar on your website by inserting custom CSS you must know that the downside to this approach is that customization on your site’s scrollbar is not a default ruleset. To overcome this obstacle, developers use browser-specific pseudo-elements or JavaScript to override the default scrollbar properties.
And this will not work on all browsers. This is because only Webkit-based browsers support the customization of your scrollbar, here are included browsers like Chrome, Opera, Safari, meanwhile, Firefox, as well as Internet Explorer do not support it and your custom scrollbar will not be applicable on these browsers.
How to add Custom Scrollbar in WordPress via a plugin?
We will begin our tutorial with the plugin approach as it is the safest and easiest way to add custom scrollbar to your WordPress website. As mentioned WordPress is a large ecosystem of themes and plugins, thus being a challenge on its self to find the most compatible and most effective plugins for any added functionality you want to include on your website.
To help you add custom scrollbars on your WordPress website, we’ve assessed the Advanced Scroll plugin to be perfect for the job, as it provides the easiest and most efficient approach. The plugin is also lightweight if you are worried about your site’s performance and loading time.
As per usual, you will first need to install and activate the plugin from the WordPress dashboard. Upon activation of the plugin, you can locate it on your WordPress dashboard, click on Settings > Custom Color Scrollbar Settings. Here you can tweak the main configurations of the plugin.
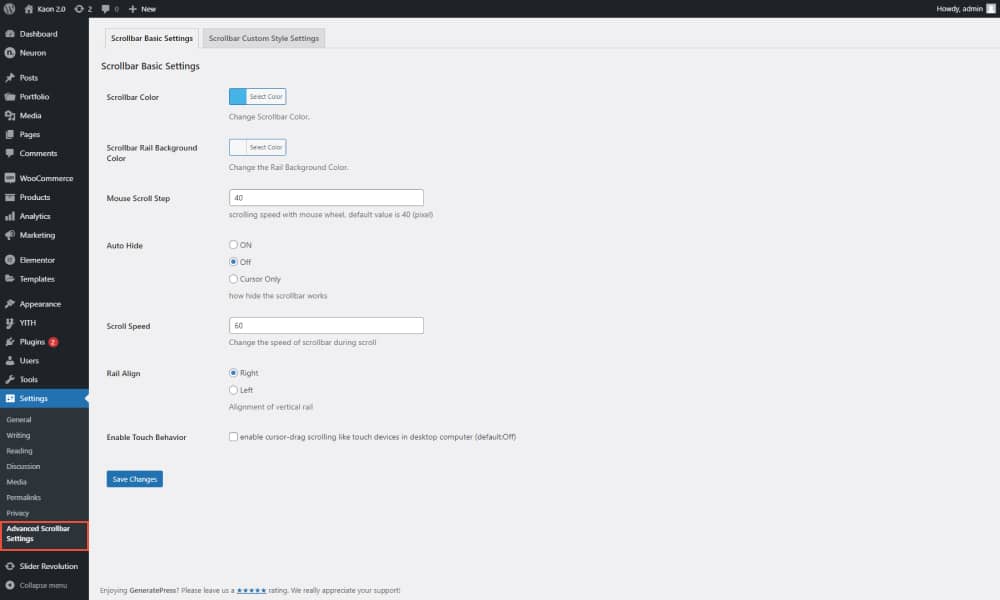
Here you will find the basic settings that the plugin provides to add custom scrollbars on your WordPress website without much trouble. The first configuration you can make is the Scrollbar Color, here you can select a color for the scroll bar as well as the scrollbar background color.
You can use these settings to match every component including scrollbars, with your brand guidelines and color palette. The Mouse Scroll Step is the setting you set for the speed of the mouse wheel, which is also configurable as well upon the powers of the Advanced Scroll plugin.
You can also choose whether or not you want to auto-hide the scrollbar. The Cursor Only option will allow you to display the scrollbar rail but not the button. Make the changes as per your desire.
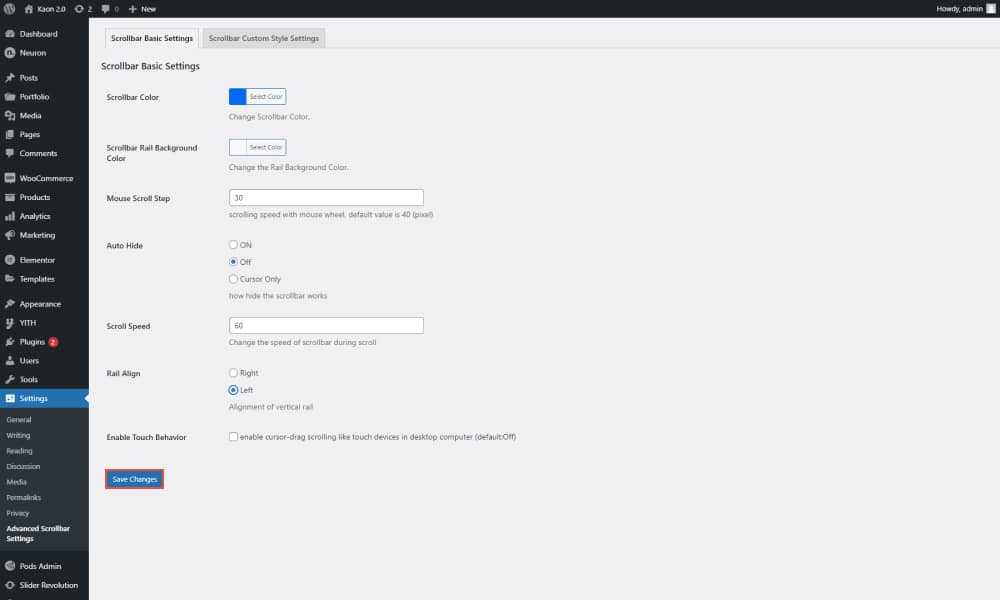
You can also set the scrolling speed of the scrollbar, you can select the alignment of the vertical rail to either be Left or Right. And lastly, with a single tick, you can enable the touch behavior in a desktop computer.
Once you’ve configured all the settings and have designed your custom scrollbar to match the rest of your site’s style, you can click on Save Changes for the changes to take place. This is where the fun part comes, you can now visit your website and see your custom scrollbar in action. See how it fits your website.

Alternative Plugin to Add a Custom Scrollbar in WordPress
We’ve emphasized the fact that a plugin will literally save your life when dealing with a WordPress website. While you are spending hours and hours trying to figure out how to add certain functionality to your website, just remember that there’s always a plugin for that. And like all cases, there’s also a perfect plugin for you to add a custom scrollbar on your website.
This is another alternative plugin to perform the same trick we discussed above. We simply wanted to provide another option in case the first one fails. We introduce to your the Custom Scrollbar plugin, a lightweight and highly capable WordPress plugin that allows you to add custom scrollbars in WordPress. As per usual, install and activate the plugin like you would with any other WordPress plugin. You can find the main settings of the plugins under Appearance > Scrollbars.
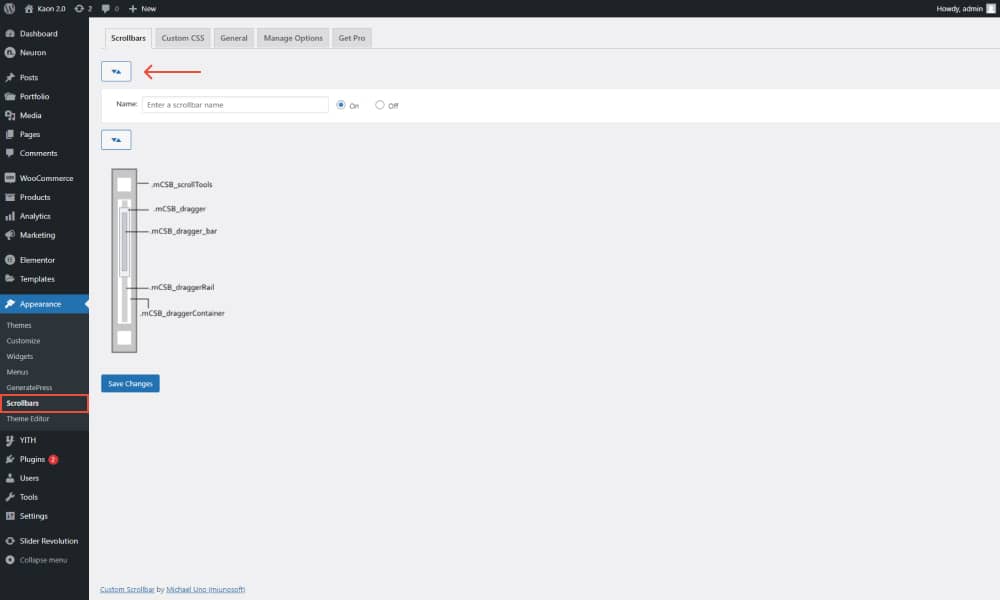
Here you can see a default image explanation of the naming of each component of the scrollbar so that you are better able to identify every particle you are customizing using the powers of this plugin. Click on this icon here that’s located above the Name the Scrollbar field to expand the settings spreadsheet.
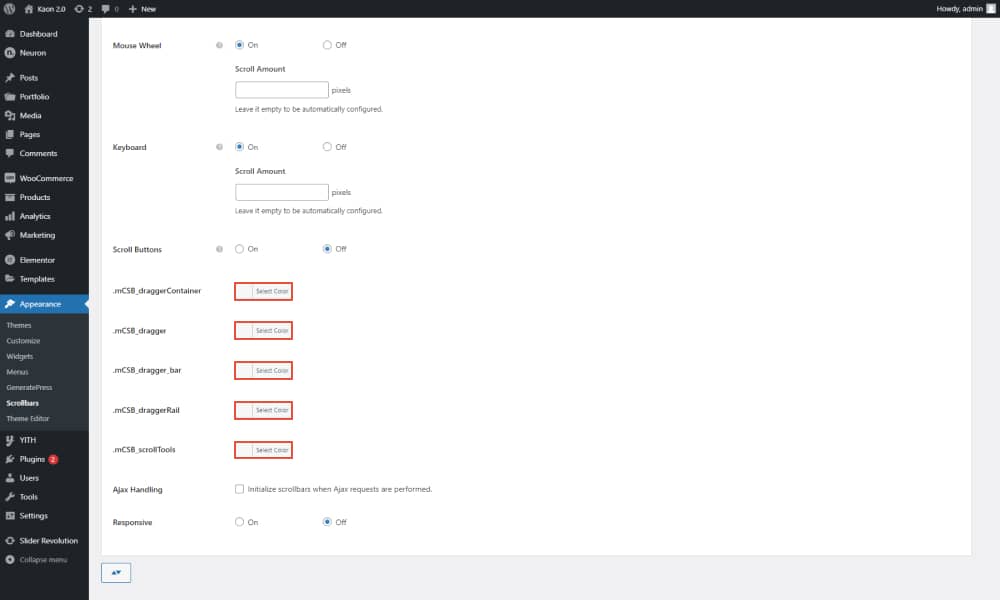
Here you can spot all the advanced configurations you can make to your custom scrollbar. You can also create more than one scrollbar. You can set the Element’s Height and Width. And if you scroll down you can also locate the more beginner-friendly settings like the option to change the default colors of the scrollbar.
There are four color settings each corresponding to the components of the scrollbar. You can choose to initialize scrollbars when Ajax requests are performed, as well as decide whether or not to display the custom scrollbar on mobile devices. Click on Save Changes once everything is set in order.
Go back to your WordPress website to see your custom scrollbar live in action. You can easily add custom scrollbar using the help of WordPress plugins, but in the section below we will show you how to add custom scrollbar by inserting custom CSS.
How to add Custom Scrollbar in WordPress with Custom CSS?
Most of the tasks in WordPress can be completed using its powerful and intuitive Admin Dashboard where you don’t have to see or deal with a single line of code. This makes WordPress a fan favorite among not-so code knowledgeable website owners. But still, WordPress lets the opportunity open to add custom CSS on your website to further tweak its styling.
Although this method is better in terms of website performance, it only works on desktop browsers using WebKit rendering engines like Google Chrome, Safari, Opera, and more.it only works on desktop browsers using WebKit rendering engines like Google Chrome, Safari, Opera, and more. This will not be applicable on mobile devices or browsers like Firefox or Edge. Nevertheless, to gain access to that tab, from the WP Dashboard, click on Appearance > Customize.
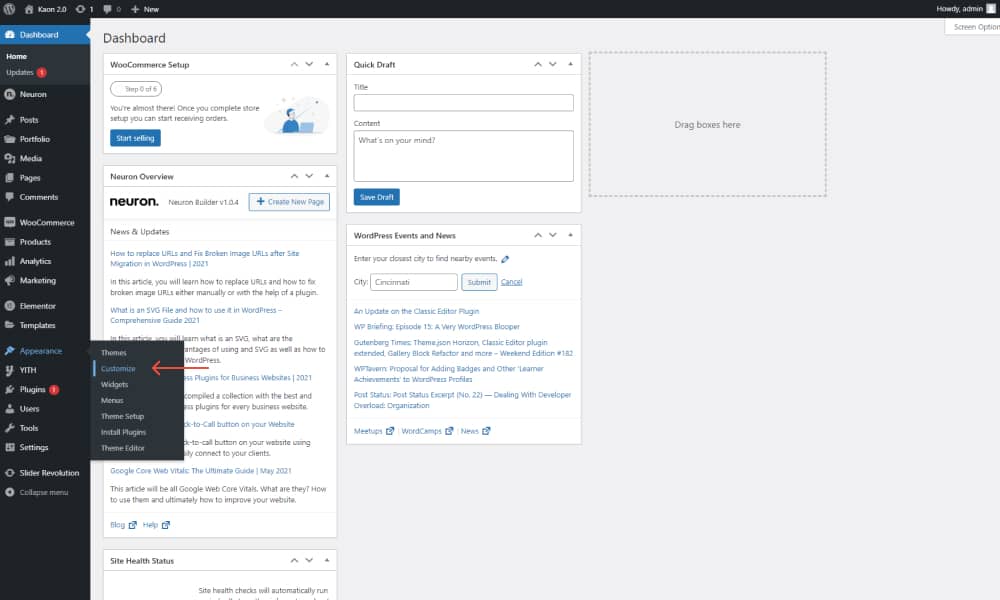
Here is where you can configure the main settings relating to your site’s design. There are numerous expandable settings included here. Scroll down and look for the Additional CSS and click upon it.

This is where you can add any custom CSS that will be applicable globally throughout your entire website as soon as you insert a valid CSS rule. Here is where you insert the following code to add custom scrollbars in WordPress.
::-webkit-scrollbar {
width: 15px;
}
::-webkit-scrollbar-track {
background: #F8F8F8;
}
::-webkit-scrollbar-thumb {
background: #FFD100;
}
::-webkit-scrollbar-thumb:hover {
Background: #E5cdbc
}

Note that we have established a scrollbar design that matches our current demo website, but you can easily customize the colors of the scrollbar as well as its background. You can also add border-radius to the scrollbar by including this pseudo-element “border-radius:5px;” below the WebKit-scrollbar thumb background. Once you have added the CSS code, click on Publish and you should see the results immediately on your website.

But before we conclude our article on how to add custom scrollbars in WordPress, we have one more trick under our sleeves, as explained above the code we integrated will not work for most browsers as well as mobile devices, if you wish to include your custom scrollbars to be visible for users who visit your website from mobile devices as well please include this line of code before the rest of the custom CSS we provided above:
@media only screen and (min-width : 981px) {
PASTE HERE YOUR CODE
}
Now that you know all the tricks on how to add custom scrollbar to your WordPress website. Go ahead and play around with your creativity to match every single component on your website with your brand’s style. Note that all the changes will be lost.
Final Thoughts
You’ve reached the endpoint of this article, we hope you found some valuable insights and knowledge on how to expand the functionality of your WordPress website as well as customize every component to match your brand and create a consistent design applicable everywhere throughout the entire website. We’ve shared our step-by-step tutorial on how to add custom scrollbars to your WordPress website. We’ve included two possible approaches that you can use based on the level of your expertise and based on how you want to customize your website.
You can easily and effectively add custom scrollbars to your website using the help of WordPress plugins. It’s as simple as installing and activating the plugins and then configure the main default settings. This means you’re only a few clicks away from customizing your WordPress website without touching a single line of code. The other approach is by inserting custom CSS code on your website.
This approach is not as technical as it sounds if you have the right code sources (thankfully we’ve shared it in the section above). The downfall of this is that Webkit pseudo-elements are not currently supported by all browsers. This means your custom scrollbar will not be visible on all browsers. Leave in the comments below your preferred method of operating. Are you team “Plugins” or team “Custom CSS”. We’d love to know.
