When running a website, there are a lot of things that can go wrong, and you should always be vigilant to keep an eye out for every issue you encounter by troubleshooting it as soon as possible. The longer your website keeps the error going, the more likely are the chances for your visitors to drop out.
There are various types of errors that we’ve covered in our articles, and this time we will cover error 503. A lot of errors that might occur on your website will show you the cause of the problem and you will be able to troubleshoot it properly, but error 503 is not of those kinds. You’ll be left wondering what caused the issue, what can’t visitors access your website. In such cases, it helps understand what error 503 is and begin locating the root of your problems.
Unfortunately, there is no clear path as to what causes the error and there is no oblivious solution to the problem. We will be covering the main causes of the error 503 and how to troubleshoot them. You can try each one of them until you locate the issue and resolve it. Common causes for the 503 Service Unavailable error are maintenance and overload. The response will be used for temporary conditions and the Retry-After header should indicate the estimated time when your website will be available.
What is an HTTP Error 503 and what causes it?
The 503 Unavailable Server error is an HTTP response status code that suggests that the server is not ready to perform the request and the most common causes for error 503 are the website is down for maintenance or that the server is overloaded and can’t handle that many requests. When you are facing an error 503 it simply means that the server is not available.
When faced with error 503, the first instinct will be to refresh the page, and sometimes the simplest approaches work. However, there are times when this does not work and requires a lot more work to identify the issue and solve it.
Unlike other errors, the 503 error indicates that your website is online and running but can’t be reached at the moment. The problem with error 503 is that it does not give you any indication as to what’s causing it, it simply presents a “ Service temporarily unavailable” message and that will be it. Sometimes when you are working on your website, updating a theme, plugin, or the main software, WordPress will shortly set your website under maintenance, thus the display of the error 503. However, the error is brief and it is unlikely to be noticeable. But if the error persists, then you will have much more work to deal with until your resolve everything that’s causing the error 503.
Most hosting providers offer fixed amounts of resources for each hosting account. The 503 Service Unavailable error occurs when your server is not able to transmit the proper response from a PHP script.
This PHP script could be a WordPress plugin, theme, or a badly written custom code snippet. If the error is caused by the overload of requests on your website, it should disappear in a while. But if the error is persistent, the most likely culprit will be a poorly code asset on your website, and you won’t be able to get your website back to its normal state until that issue is resolved.
In this article, we will show you how to fix error 503 and get your website back to normal. We will show you all the possible causes and their fixes. It might take a while until you identify the issue, but you should be able to find your fix if you go one by one, issue by issue.
The different variants of error 503
The error 503 can be displayed in various ways and showing different extensions, but what makes it identifiable is the 503 code in front of it, this means it is simply a variant and that you should take action quickly.
Depending on the server configurations and browsers these are the different variants of error 503
- 503 Service Unavailable
- 503 Service Temporarily Unavailable
- Http/1.1 Service Unavailable
- HTTP Server Error 503
- Service Unavailable – DNS Failure
- 503 Error
- HTTP 503
- HTTP Error 503
- Error 503 Service Unavailable
- Error 503 Backend fetch failed
The 503 Service Unavailable error will be displayed inside the browser’s window, just like web pages do. No matter the variant of the error 503, you should take action as soon as possible to keep your site’s users engaged and interact with your website, otherwise, you might notice a drop in your traffic and leads.
How to fix the error 503 in WordPress?
As we mentioned in the sections above the error 503 is caused when your web server is not able to get a proper response from a PHP script, thus the display of the error. Since in most cases we don’t know what is the possible cause of the 503 Service Unavailable error then, you must try out all the plausible solutions and refresh your website each time you make a fix.
We’ve compiled all the possible culprits and how to fix the error 503 using the most methodological approaches to make sure your website is safe and at the same time the issue to be resolved. Go through each one by one until you locate the faulty reason as to why your website is showing the 503 error.
Deactivate all your WordPress plugins temporarily
All your WordPress plugins are PHP scripts, and the most common cause of the error 503 in a WordPress website will be caused due to incompatibility in code with a particular plugin. The best approach to determine whether a WordPress plugin is at fault for the cause of error 503 is to disable them all and go back to your WordPress website to see if the issue disappeared.
The 503 Service Unavailable error will not allow you to access the WordPress admin area where you can manage all your installed plugins, you will need to find another alternative to gain access to the plugins folder. The best approach to this will be via cPanel or an FTP Client. You can use popular software like FileZilla.
Once you’ve been connected either to the FTP Client or you’ve had access to the cPanel, navigate to your WordPress root folder which is typically called public_html or simply public.

Click on that folder and navigate to the wp-content folder and once again click upon it. There you should find the plugins folder. Here you will find all the individual sub-directories for each plugin on your website, all active and inactive.

What you will need to do is rename the plugins folder. You can try something like plugins-rename, or anything you feel comfortable with. Just make sure you recognize the renamed folder.

What happens when you perform such tasks is that WordPress will not be able to locate any of the plugins you’ve installed and activated on your website and will automatically disable all of them. Since all of the plugins on your WordPress website have been deactivated, you can go back to your website and see if the issue with error 503 has been resolved.
If yes and your website is back to normal then this is an indication that one of the plugins is at fault. Now, all there’s left to do is figure out which one of the plugins caused the display of error 503. Now you will need to go back to your FTP Client or cPanel once again.
First things first, return to the wp-content directory and rename the plugins folder back to its original name. Once you are done with that you will need to disable each plugin one by one and test your website whether or not the error 503 has disappeared. The process is more or less the same
- Click on the plugins folder and start with the first plugin on the list
- Rename the folder to anything you wish, simply make it distinctive
- Go back to your WordPress website to see if the error has been resolved
- If the error is still persistent, rename the folder back to its original name and move on to the next plugin
- Repeat the process for each plugin one by one
Another alternative once you have deactivated all the plugins will be able to access the WordPress Dashboard area, from there go Plugins > Installed Plugins and activate each plugin one by one and visit your website after each plugin activation. Once the error 503 appears, know that the last plugin you activated will be at fault.
If you’ve done this process and have found that one of the plugins is the cause that the 503 Service Unavailable error appeared then you shall not take upon the other approaches. If you’ve found that once you’ve deactivated all the plugins the error is still apparent then please proceed with the other fixes.
Deactivate your WordPress theme
If you have followed all our steps for deactivating your installed WordPress plugins and you haven’t still found the cause of the error 503, it’s time you try to deactivate your WordPress theme as alongside plugins, themes are another popular cause for the display of 503 Service Unavailable error.
The process of deactivating your WordPress theme is not quite the same as deactivating your WordPress plugins, because WordPress won’t revert back to the default theme if you simply rename the theme folder. This will cause the appearance of the “The theme directory “theme name” does not exist.” error and we don’t want that. For this approach, you will need to access the WordPress databases via phpMyAdmin.
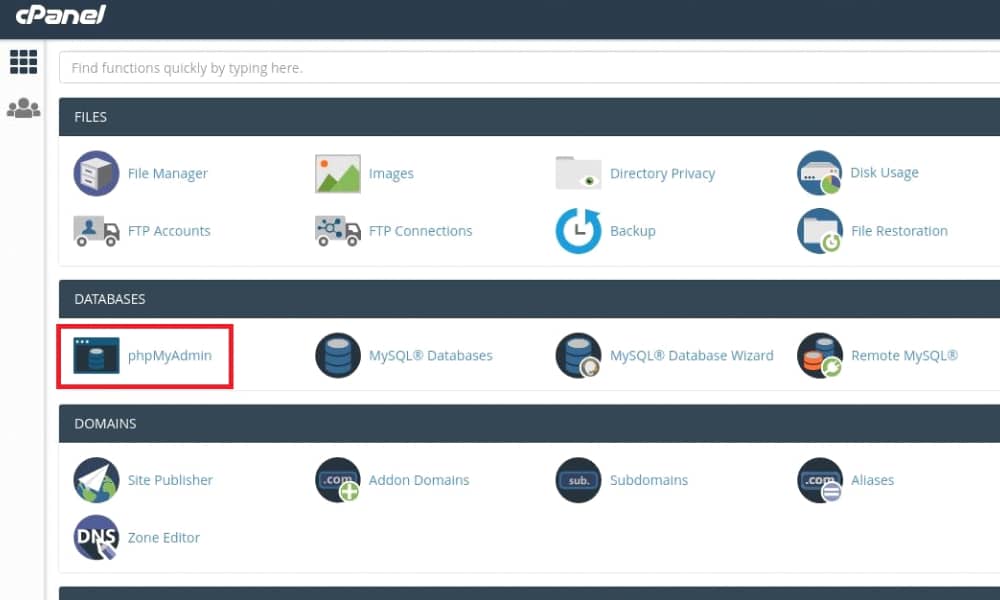
Next, you will need to click on the wp-options table. This will open your WordPress database. Click on the Search tab at the top of the page. Under the option-name, you’d want to search for template.
On the option_value you will find the name of the currently active theme on your WordPress website. Click on Edit or double-click on it and change the name to a default WordPress theme like “twentytweny”.
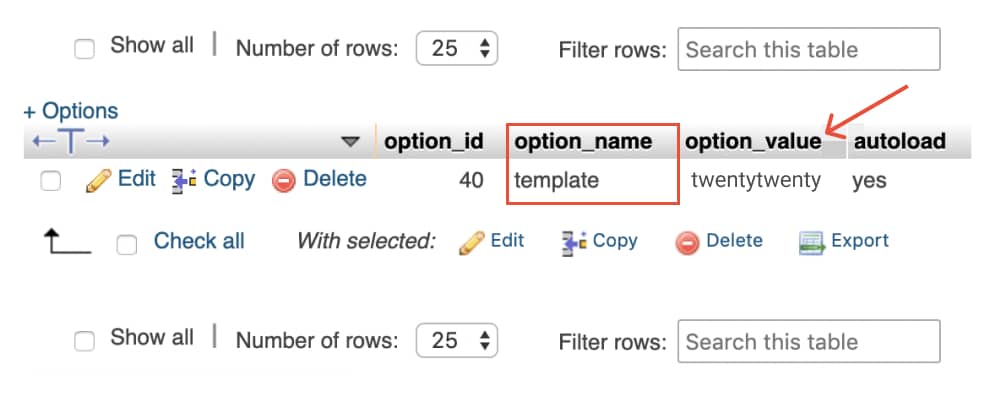
Now go back to your WordPress website to see if the error 503 has been resolved. If yes, then this means that your WordPress theme was the culprit after all. You can try and reinstall the theme once again or go back to the most recent backup of your theme.
Enable WP_DEBUG mode
If you’ve tried to deactivate all your plugins and to deactivate your currently active WordPress theme and still you’ve had no luck to troubleshoot the error 503 then this indicates that there might be a broken PHP snippet somewhere on your website and you should further try to debug your website to fix the apparent issue. Once again, since you are not able to gain access to your WordPress dashboard area, you will need to debug your website either using an FTP Client or cPanel.
- What’s important is that you first locate the public_html folder
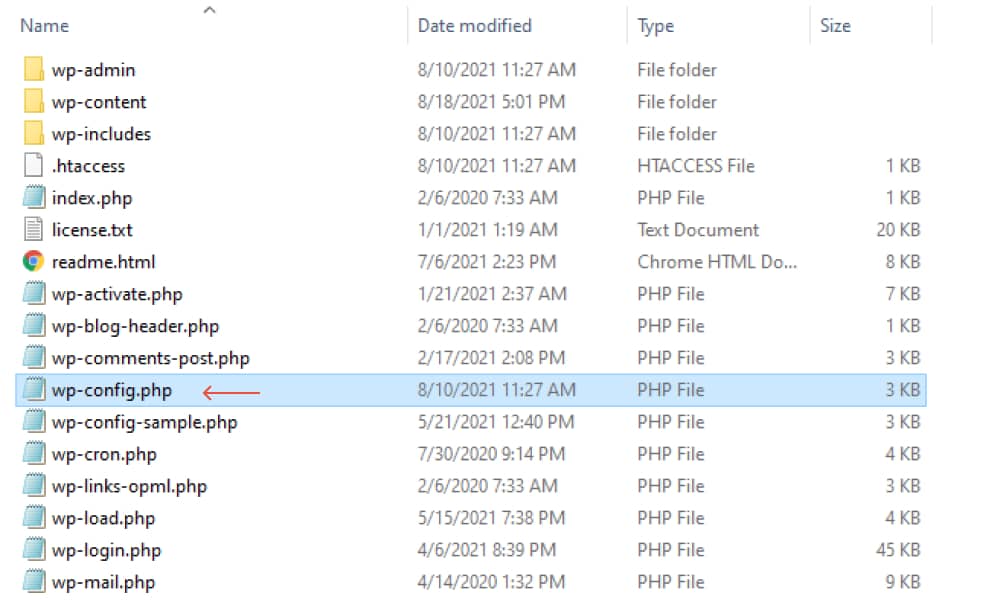
- Next, locate the wp-config.php file and click to open it
- Now you should paste a piece of code onto the file. Scroll down to where WP_DEBUG is defined, it should look something like this define (‘WP_DEBUG’, false); or if you cannot find it paste the code right before the line that says “/*That’s all, stop editing! Happy blogging.*/:
- This is the piece of code you will need to paste into
define ('WP_DEBUG', true);
define ('WP_DEBUG_LOG', true);
define ('WP_DEBUG_DISPLAY', false);
@ini_set ('display_errors', 0); 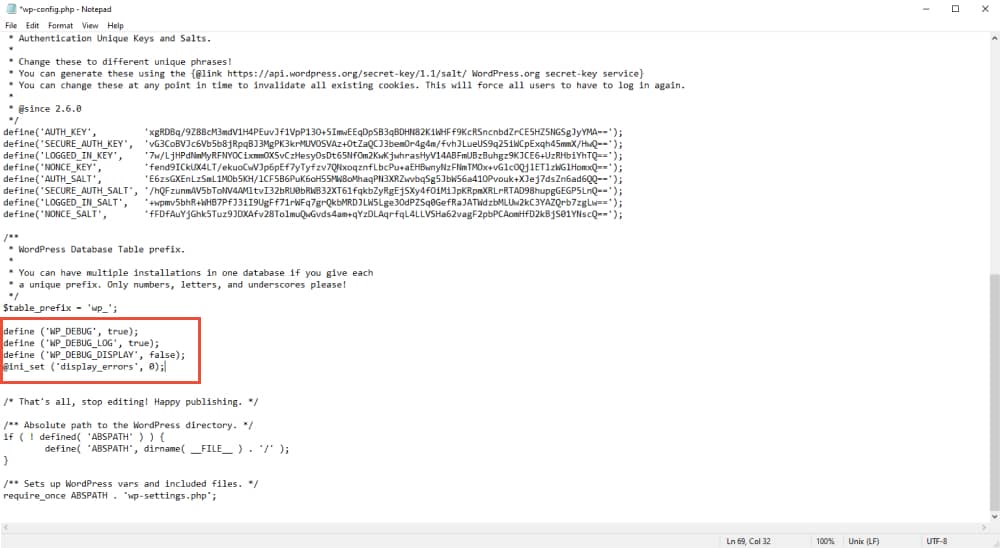
Once you are done make sure to click on Save and close the window. Now you should take advantage of the error logs. You can typically find the folder inside the public_html directory under the name “logs” or “error_log”. Here you will find all the logs and each error that appears on your WordPress website in chronological order. It shows which file caused the error and which specific line of code.
Disable your Content Delivery Network (CDN) temporarily
There are cases when the 503 Service Unavailable error will be present, not due to a faulty theme or plugin but due to a problem with your Content Delivery Network. If you are using a CDN provider to power your website, then simply disabling it for a while will show whether or not is at fault. Every CDN should include a feature that allows you to temporarily stop their service, but that might be different for any CDN provider.
You can locate the switch button and disable your CDN to see it if causing the error 503 on your website. Although this can rarely be the case as CDN providers are network servers for the distribution of the content, but just to be on the safe side. If you can’t find how to disable your CDN service, please refer to their documentation as they will most likely put the instructions online.
If you don’t use a CDN provider on your website, then simply skip this step and go about to try other fixes that will resolve the error 503 that’s displayed on your site. Just make sure to activate your CDN provider once you find that the issue does not reside there.
Limit the WordPress Heartbeat “API”
WordPress Heartbeat is an API that’s built-in in WordPress introduced since WordPress 3.6 and as the name indicates this API sends constant pulses (or as technically called as ticks) to perform period tasks. This facilitates the communication between the server and the browser using AJAX and sends real-time notifications on the WordPress dashboard. This API also serves as a notification push from plugins, when someone else is working on a post or to auto-save content.
All this process is being performed with a high frequency and consumes your server’s resources which will cause the 503 Service Unavailable error to occur, although this is quite rare it still happens if the server can not take upon the load. To test whether or not the WordPress heartbeat API is to blame for the error 503 on your website you will need to limit its resources.
To do that you can use a WordPress plugin like Heartbeat Control. First let’s take a look if the API is the one at fault, to determine that we will need to disable it temporarily. To do that you will simply need to connect to your FTP Client or gain access to the cPanel.
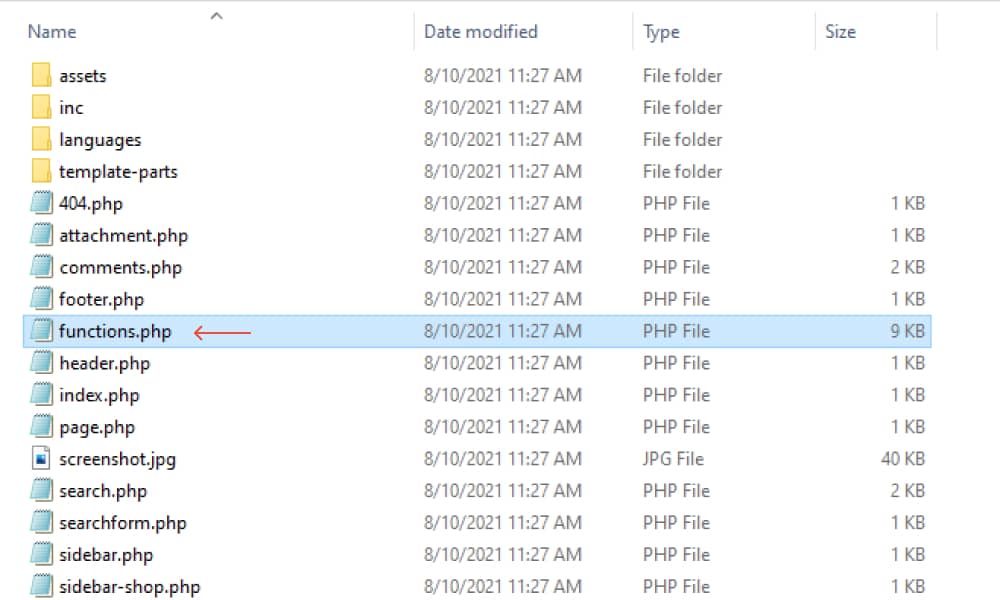
Next, you will need to locate the folder of your current theme that’s active. Finally, find the function.php file and you will need to add the following code snippet right after the opening <?php tag. *IMAGE Right-click on the file and select the View/Edit option to make changes to the file.
add_action( 'init', 'stop_heartbeat', 1 );
function stop_heartbeat() {
wp_deregister_script('heartbeat');
}
Save the changes you’ve made to the functions.php file and retry accessing your website. This will cause the Heartbeat API to be temporarily disabled. Go back to your WordPress website and reload the page to see whether or not the API was to blame.
If you see that the error 503 is gone, you should know that the Heartbeat API is at fault and you can try to limit its functions for it not to cause any more troubles.
Limit the Googlebot Crawl Rate
As you probably know Google and other search engines crawl and index your website’s content and this helps them categorize and rank web pages based on the information they present. They visit your website regularly to determine the quality of your website’s content and present it to the rank metrics.
Although Google has sophisticated its algorithm to optimize the number of crawls on each website, it might be that sometimes it overloads the website and causes the appearance of the error 503. To reduce the Googlebot crawl rate, you will need to use the Google Search Console.
To do that open the Crawl Rate Settings Page, add your property, and select the option to which you want to limit the crawl rate. Note that you can not increase the crawl rate. The new crawl rate you set will be valid for 90 days only.
Final Thoughts
We’ve discussed a lot about error 503, what is, the main causes, and how to find the best solution to resolve the 503 Service Unavailable error. We’ve shared our comprehensive guide on how to fix the error 503 and what steps to take into such an account.
If you first notice the error 503 try troubleshooting it with a simple page refresh, or if you are lucky your website has been put automatically under maintenance after you’ve been updating plugins, themes, or the core software. When first approached with the error 503, we’ve put together a list of all the plausible issues on your WordPress website and how to fix them
- Deactivate all the installed plugins on your WordPress Website
- Disable the theme that’s currently active on your website
- Enable WP_DEBUG mode
- Disable your Content Delivery Network
- Limit the WordPress Heartbeat API
- Limit the Googlebot Crawl Rate
Leave your comments on the best solutions that have worked wonders so far trying to troubleshoot the error 503.
