WordPress is the most popular CSM platform and offers the upload of a wide range of image types including here jpg and png. However, that is not the case for SVGs, Scalable Vector Graphics, as WordPress doesn’t natively support their upload. SVG files are usually preferable for designers due to the fact that they are a scalable image format, they don’t pixelate on retina screens, and come generally smaller in file size. SVGs have become a widely used image format on the Web.
Although traditional image file formats like mentioned above can be used perfectly for images and complex photographs, SVGs are the one format that meets the need of today’s development requests like scalability, programmability, responsiveness, interactivity, performance, and accessibility.
For this article, we will show you what SVG files are, how you can upload SVG in WordPress in three different ways, and we will also tackle a few points on website security too.
The reason WordPress does not natively provide SVG support is because of the security threat they pose. SVG files are vulnerable to various cyber-attacks. Although it is fairly easy to upload SVG in WordPress as there are dedicated plugins for the job and we will elaborate further on the article.
What are SVG Files?
To put it simply SVG or Scalable Vector Graphic is a standard graphic file format that is used to render two-dimensional images on the Web by using the XML markup language. The reason why SVG files are beloved is that it allows you to enlarge images without losing quality or becoming pixelated.
Unlike other most used format files, SVG format will store images as vectors, which are made of lines, points, curves, colors, and shapes based on precise formulas. SVG is made of plain XML language and uses tags like HTML, although it’s stricter. Here’s what an SVG file looks code like
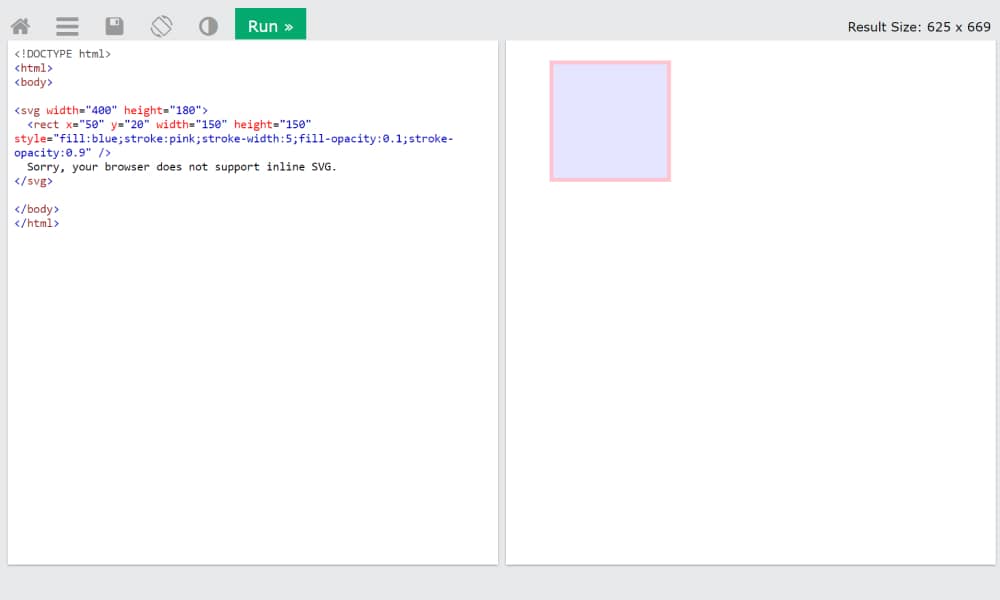
As you can see SVG documents are nothing more than simple plain text files that describe the vectors. The best thing is that these files are easily readable, understandable by humans, and modifiable.
When you embed SVG files in an HTML document as an inline SVG you can easily animate and manipulate the SVG code via CSS or JavaScript and this feature makes them so popular and flexible to use. You can upload SVG in WordPress and animate them as per your desire once you ensure SVG support for your website.
Why should you use SVGs
As mentioned SVGs are vector formats, meaning they are scaled automatically in web browsers and professional photo editing tools. Usually, when you try to upscale a PNG or JPG format while editing, you can’t do that without the files being pixelated, whereas SVG files will look pixel-perfect no matter how much you upscale them.
For this reason, the upload of SVG files on your website will have many benefits, including here the performance of your website and we will explain how. Here are some benefits to upload SVG in WordPress or any other platform your use.
- SVG Browser Support – All the major web browsers fully support the upload of SVG files, including here mobile browsers. Except for Internet Explorer 8 which does not fully support SVG file upload, in such case, it is preferable to use a PNG or JPG file format as a fallback option ( Although I doubt someone will now use Internet Explorer, just to stay on the safe side)
- Google will index SVG files – Whether it is in a standalone file or embedded directly in HTML google will index SVG content, which means it’s also good for SEO. SVG files are text-based, and when you embed them on a page they can be searched and indexed by search engines as well as be accessible to screen readers and other devices.
- Smaller File Size – SVG files are considerably smaller in size file, especially in correlation with the other two formats JPG and PNG. By uploading SVG files on your website you will increase your site’s performance because your overall page size will decrease.
- SVGs are best used for logos and icons – SVG files are best suitable for logos, icons, or images with minimal design, as the more complex the image is the more size file it requires, thus it is recommended to use a combination of format files on your website.
- SVGs are easily scalable – As we mentioned SVG files are easily scaled upwards or downwards without them losing the quality or change in size files. But this is not the case for PNG and JPG formats as they tend to lose the quality as you upscale them because of their fixed dimensions. With SVG you can create all sorts of shapes, paths, or text elements to create beautiful visuals and they will look clear and neat on every size.
What the SVG disadvantages
Up until now, we raved about how amazing SVG files are and how they can help improve your site’s speed and performance, but as with everything there are always side effects and downsides that may or may not be worth the risk. The main reason why you can not upload SVG in WordPress is that these types of files are vulnerable to security breaches.
SVG files are document format and XML-based, which means they are prone to several vulnerabilities that other formats are not. Here are included, XML external entity attacks, bomb nested entities, brute force attacks, and XSS attacks. The best solution to is to use SVG files from known and reliable sources, to also restrict the SVG upload to administrator only for example, and to sanitize your website. Sanitation means cleaning the code or input in order to avoid security issues, code conflicts, or errors.
To learn more about security, make sure to check out this WordPress website security guide to help you. Now we will reveal the best approaches to upload SVG in WordPress using the help of a plugin or manually.
Upload SVG in WordPress using a Plugin
WordPress is a popular and widely used publishing platform, which means users of all knowledge profiles will be building their website upon. The easiest way to upload SVG in WordPress is using the help of a plugin. You can use a free WordPress plugin from its repository (although we recommend you check out the plugin credibility) to get you started.
You will be able to upload SVG in WordPress as well as display inline SVGs in WordPress posts and pages. What you will need to do first is install the SVG Support Plugin from the WordPress repository. You can check out the guide on how to install a WordPress plugin for more details. Once you’ve installed the plugin, click on Activate to get going.
You can find the plugin’s configurations under Settings > SVG Support. From there you can tweak the main settings like restricting the SVG upload to site administrators only. The next step would be to Enable the Advanced Mode ON. This will help you use advanced features like CSS animations and Inline SCG rendering.
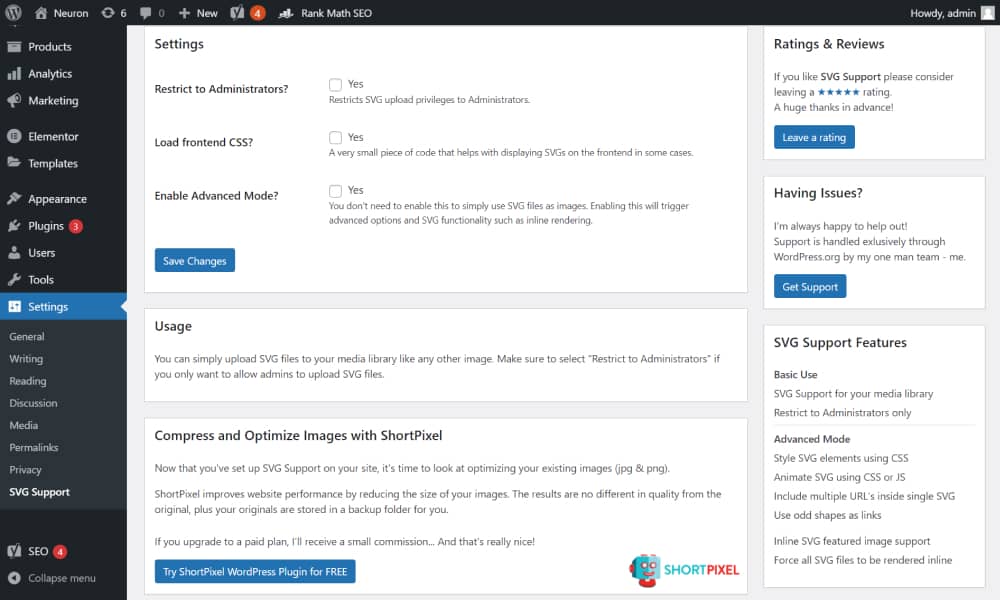
Once you are done configuring the main settings, click on Save Changes and you will be able to easily upload SVG in WordPress without any problem. Besides the SCG Support plugin, you can also upload SVG in WordPress by using another great plugin like Safe SVG. Once again, search for the plugin from the WordPress repository and install it.
Then you will need to activate the plugin. Upon activation, the plugin will work out-of-the-box without having to configure any settings. And the best thing is that this plugin utilizes the SVG-sanitizer library where you can upload SVG images via the WordPress media library.
The downside of this plugin is that you can not restrict user roles to upload SVG files, every user that writes on your website can upload SVGs. You will need to purchase the premium plan to restrict administrators only to upload SVG files.
Upload SVG files in WordPress Manually
If you don’t prefer to use plugins to do the work for you while there are always manual approaches, then we will elaborate on this perspective as well. You can manually enable your WordPress website to support SVG upload. Follow us along.
Step one would be to open and edit your site’s function.php file in WordPress. To do that go to Appearance > Edit Themes from your WordPress Dashboard. And then on the left side of the screen locate the functions.php file.
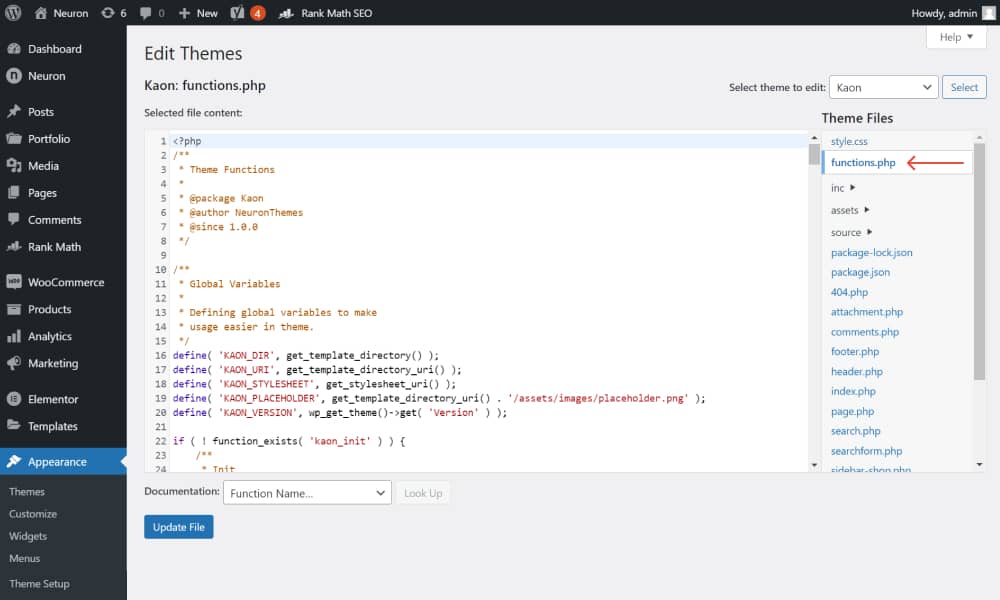
You can also access this file via your FTP client like FileZilla or from cPanel. But for this article, we are enabling the SVG support from the WordPress’ functions.php file.
We strongly suggest you make the changes to your child’s theme or switch to a development environment. This will keep your website safe while you are making changes to it, or it will save the changes even if there’s an update on your theme.
Now it’s time you add the holy code to enable SVG support in WordPress.
// Allow SVG
add_filter( 'wp_check_filetype_and_ext', function($data, $file, $filename, $mimes) {
global $wp_version;
if ( $wp_version !== '4.7.1' ) {
return $data;
}
$filetype = wp_check_filetype( $filename, $mimes );
return [
'ext' => $filetype['ext'],
'type' => $filetype['type'],
'proper_filename' => $data['proper_filename']
];
}, 10, 4 );
function cc_mime_types( $mimes ){
$mimes['svg'] = 'image/svg+xml';
return $mimes;
}
add_filter( 'upload_mimes', 'cc_mime_types' );
function fix_svg() {
echo '';
}
add_action( 'admin_head', 'fix_svg' );
Scroll down to the bottom and paste the code presented above into the functions.php file. Click on Save Changes and test out the results. Go back to the WordPress editor and upload an SVG file. You can easily do that using the Image block.
How to Upload SVG files in WordPress using Elementor
One last final resort is the use of Elementor to upload SVG in WordPress. Elementor is a leading WordPress page builder that uses an intuitive drag&drop interface for page creation. Start by creating a new page or editing an existing one with Elementor.
You can begin designing and adding the elements you need to create your page using the widgets on the left panel. You can easily upload SVG images by using the Upload button that appears on any widget with icon controls to open the WordPress Media Library manager.
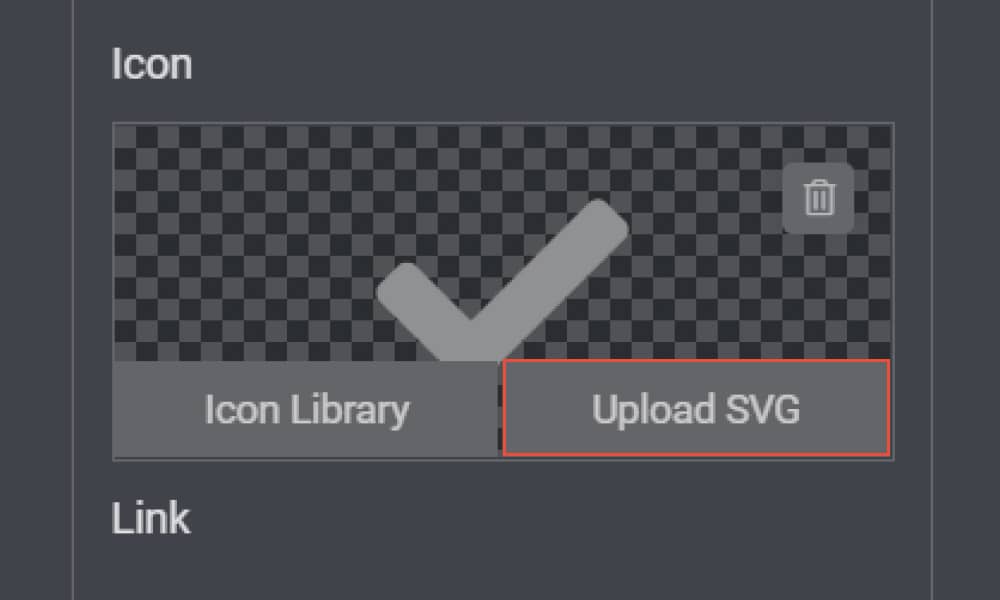
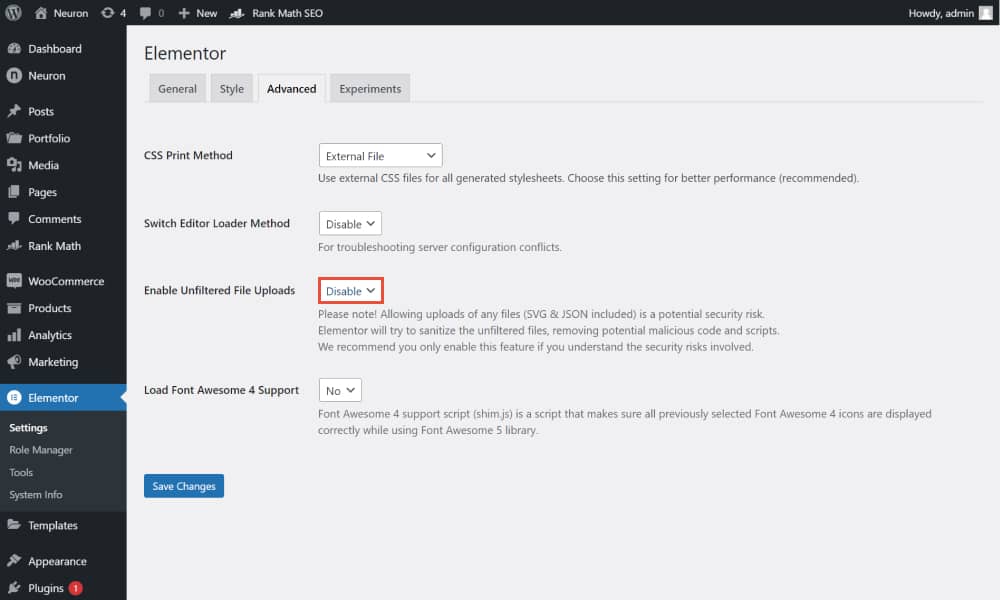
If it’s your first time uploading an SVG file in Elementor you will see a warning message to alert you that uploading any files including SVG files will pose a security threat, and if you understand the risks involved click on Enable to agree to the statement. This will then take you to Elementor > Settings > Advanced Page. Select the Enable Unfiltered File Uploads option and from the dropdown menu choose Enable. Click on Save Changes and you’ll be good to go. You can return to your page editing and designing as per usual.
Elementor’s SVG module will sanitize the SVG files uploaded on your website, but it is good practice to follow up on the advices we gave earlier to only upload files from reliable sources. Once you upload an SVG file using Elementor, it will sanitize the file, will remove any possible malicious code, and will leave only the skeleton of the required image. The SVG is inserted into the page as inline code.
Final Words
This concludes our article on how to upload SVG in WordPress. We have tackled all the issues surrounding the SVG and the benefits it has to offer. SVG files are highly flexible, scalable, accessible, and come in small file sizes that can be used for a variety of purposes on the Web and these are the main reasons web designers particularly love to use SVG files.
Incorporating all the best practices for SVG upload in WordPress you can noticeably improve your site’s performance and speed by converting some of the unnecessary PNG or JPG files to SVG files, preferably for icons, logos, or minimalist images.
Due to their flexibility, the majority of web browsers fully support SVG files and are also indexed by search engines, which can be a good thing for SEO as well. You can enable SVG support in WordPress using the help of a plugin, manually or upload SVGs using Elementor page builder. We’ve discussed all the mentioned methods above in detail.
