Seeing the emerging usage of mobile devices it is no wonder that the web world is shifting towards a new trend and website owners are constantly making effort to make their websites mobile-optimized in terms of design and functionality as well in order to provide only the best user experience.
If you have established a website for your business to flourish online as well, it can be a small yet important detail to add a click-to-call button to allow users to contact you and call you directly and have all their pre-sales questions answered personally. This will have a positive impact on users and will make you more reliable.
How do Click-to-Call buttons work?
Click-to-Call button or clickable phone numbers are easily creating with HTML or using the help of a plugin as we will explain both methods, and the browser will respond to HTML 5 protocols according to their action.
Once the users click on the button or link that you provide with the telephone number it will either launch the phone app and add the number to the display, make the call directly, or users will be presented with a confirmation to proceed with the call first, depending on the browser.
The important thing is that you will be able to connect to all your clients and pitch them personally in real-time. By adding a click-to-call button your users will be able to contact you without using any other software, they can comply use the mobile device they own.
Why Add a Click-to-Call button to your website?
If you are a small business that relies on having explanatory or pre-sales questions with your clients or if you just simply want to offer a more accessible method of having your clients contact you, then a click-to-call button will be the obvious tool you need to implement on your website.
We mentioned how clickable phone numbers can have a positive impact on your website and how they work, click-to-call buttons will be a great asset on your website.
Although they are multiple ways to keep in touch with your clients such as contact forms, live chats, support tickets, or other means, a clickable telephone number will provide that human responsive that some clients crave. And with more people using mobile phones to performs daily tasks, a click-to-call button will be a better way to serve your clients.
You can easily provide a great user experience for your clients as you are offering a more accessible means of communication that they can reach with just a click without having to fill in additional information, they will be more inclined to contact you and this will result in more sales and conversion.
How to Add a Click-to-Call button on your website using a plugin
WordPress plugin will extend the default functionality of your website and provide you with much flexibility to create just about anything, all by performing a few simple steps. And adding a click-to-call button can be as simple as that. Stray away from adding code to your website, especially if you don’t have the proper knowledge of it.
That is why we recommend using a plugin to add a click-to-call button on your website so that users can easily click on the button and they will be forwarded with the call. The first thing you need to do is search for the WP Call Button plugin from the WordPress repository and install it. Follow the in-depth guide on how to install a WordPress plugin.
Once you have installed the plugin you will need to activate it. After that, the plugin will appear on the left panel of the WordPress dashboard for easy access.
Upon activation of the plugin, you can access it from WordPress Dashboard > Settings > WP Call Button.
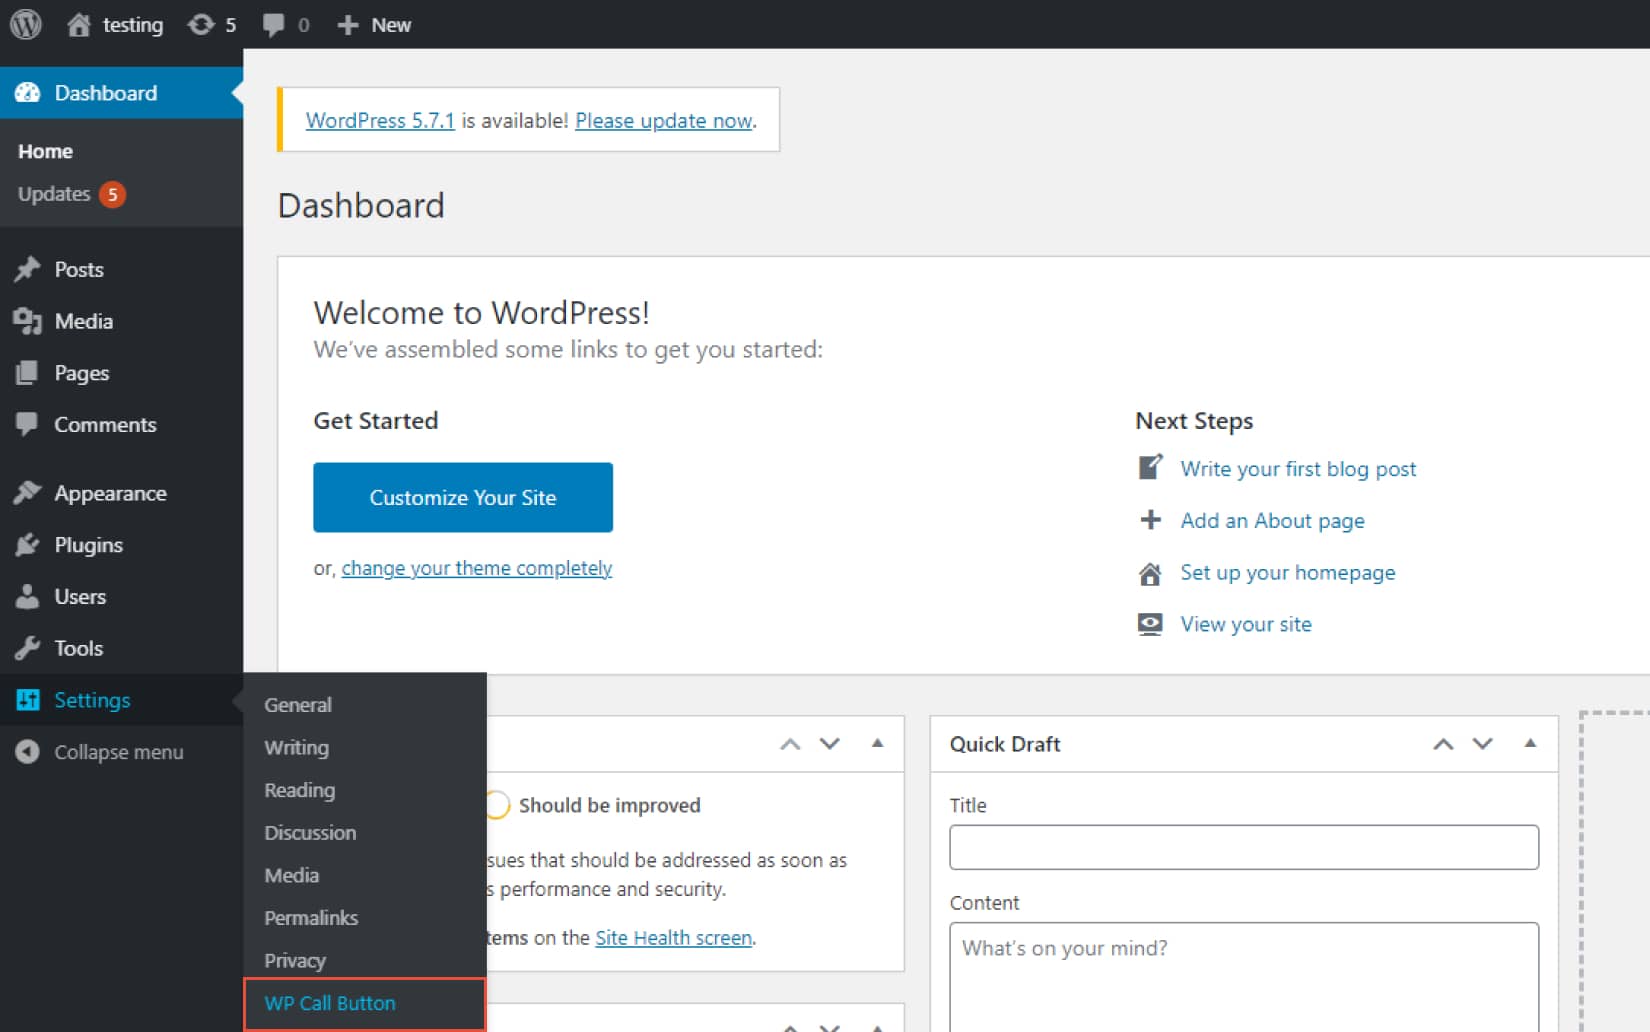
From there you will have access to the plugin’s main configuration settings. This plugin offers the possibility to add a click-to-call button on all your posts or pages using either Gutenberg or the classic editor, on the sidebar or any widgetized area, as well as have the click-to-call button sticky while users scroll the page.
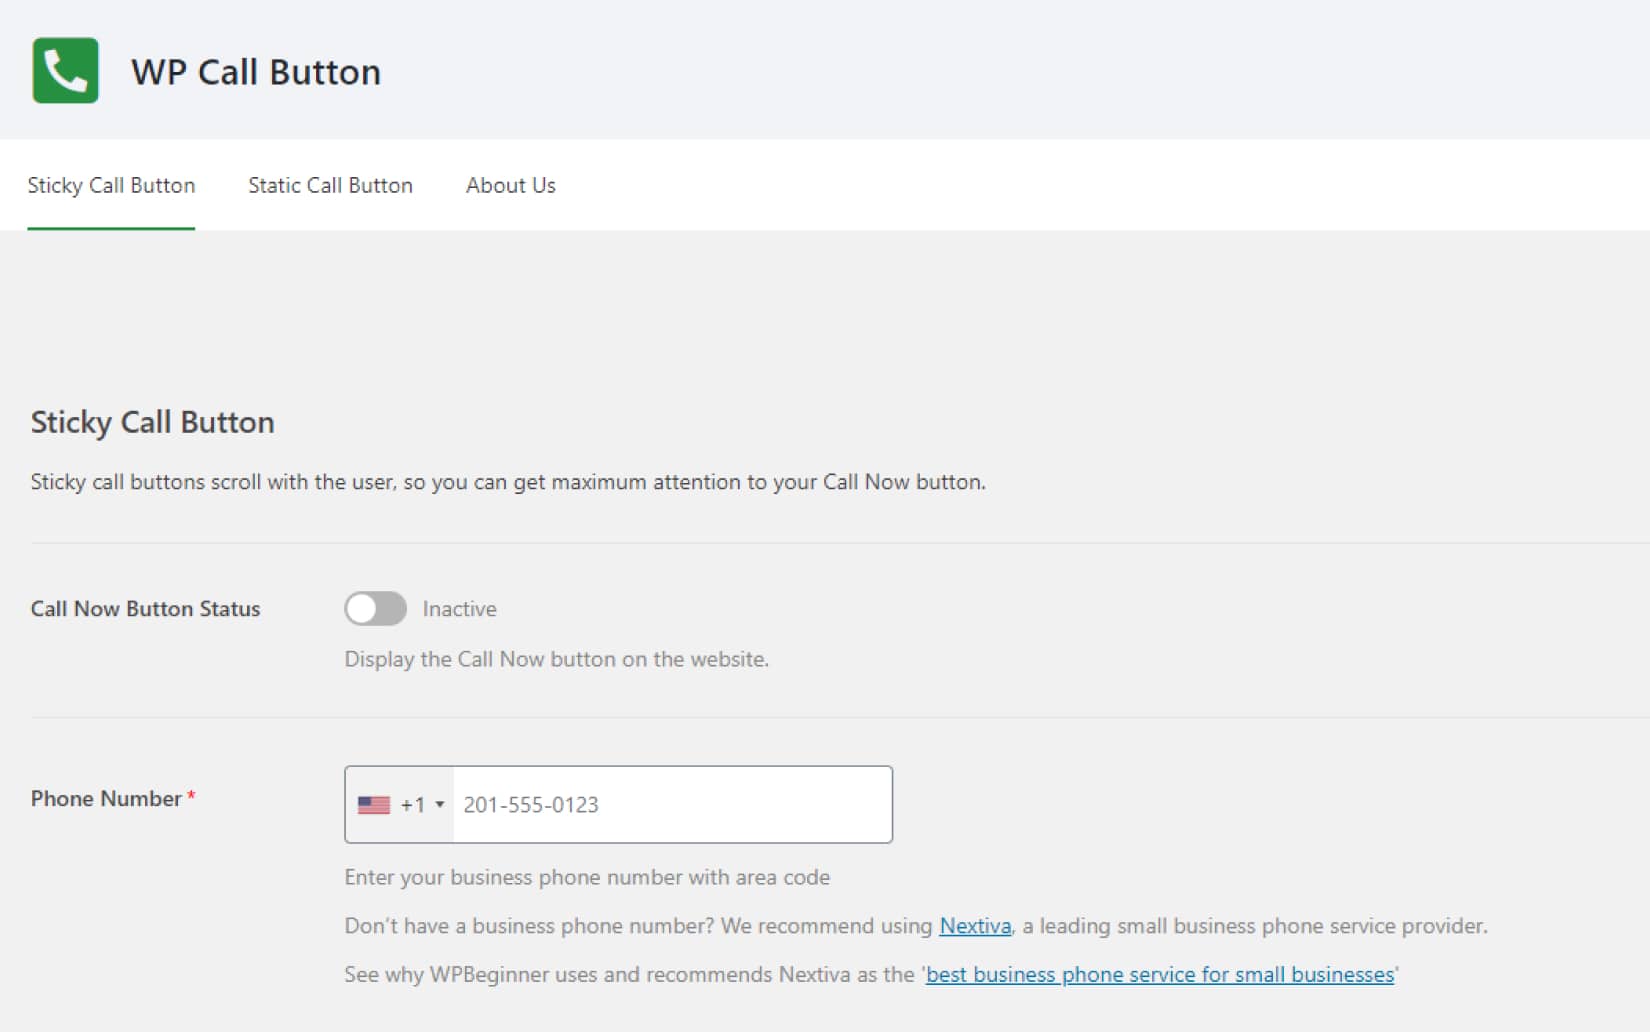
As you can see you have the Sicky Call Button Static Call button tabs divided individually and we will give a detailed explanation on both of them. First off we have the Sticky Call Button tab, the first and main settings will be to add the telephone number that users can call your business.
If you select a country, the plugin will automatically add the country’s code in front. This is a smart checklist that does all the work for you. And the remaining field will need to be filled with your telephone number.
This is the field where you add the telephone number for both, the sticky and the static call button. The data will be pulled from this setting and users will directly call the telephone number provided in that field. Scrolling down you will have a few more settings to configure for this tab.
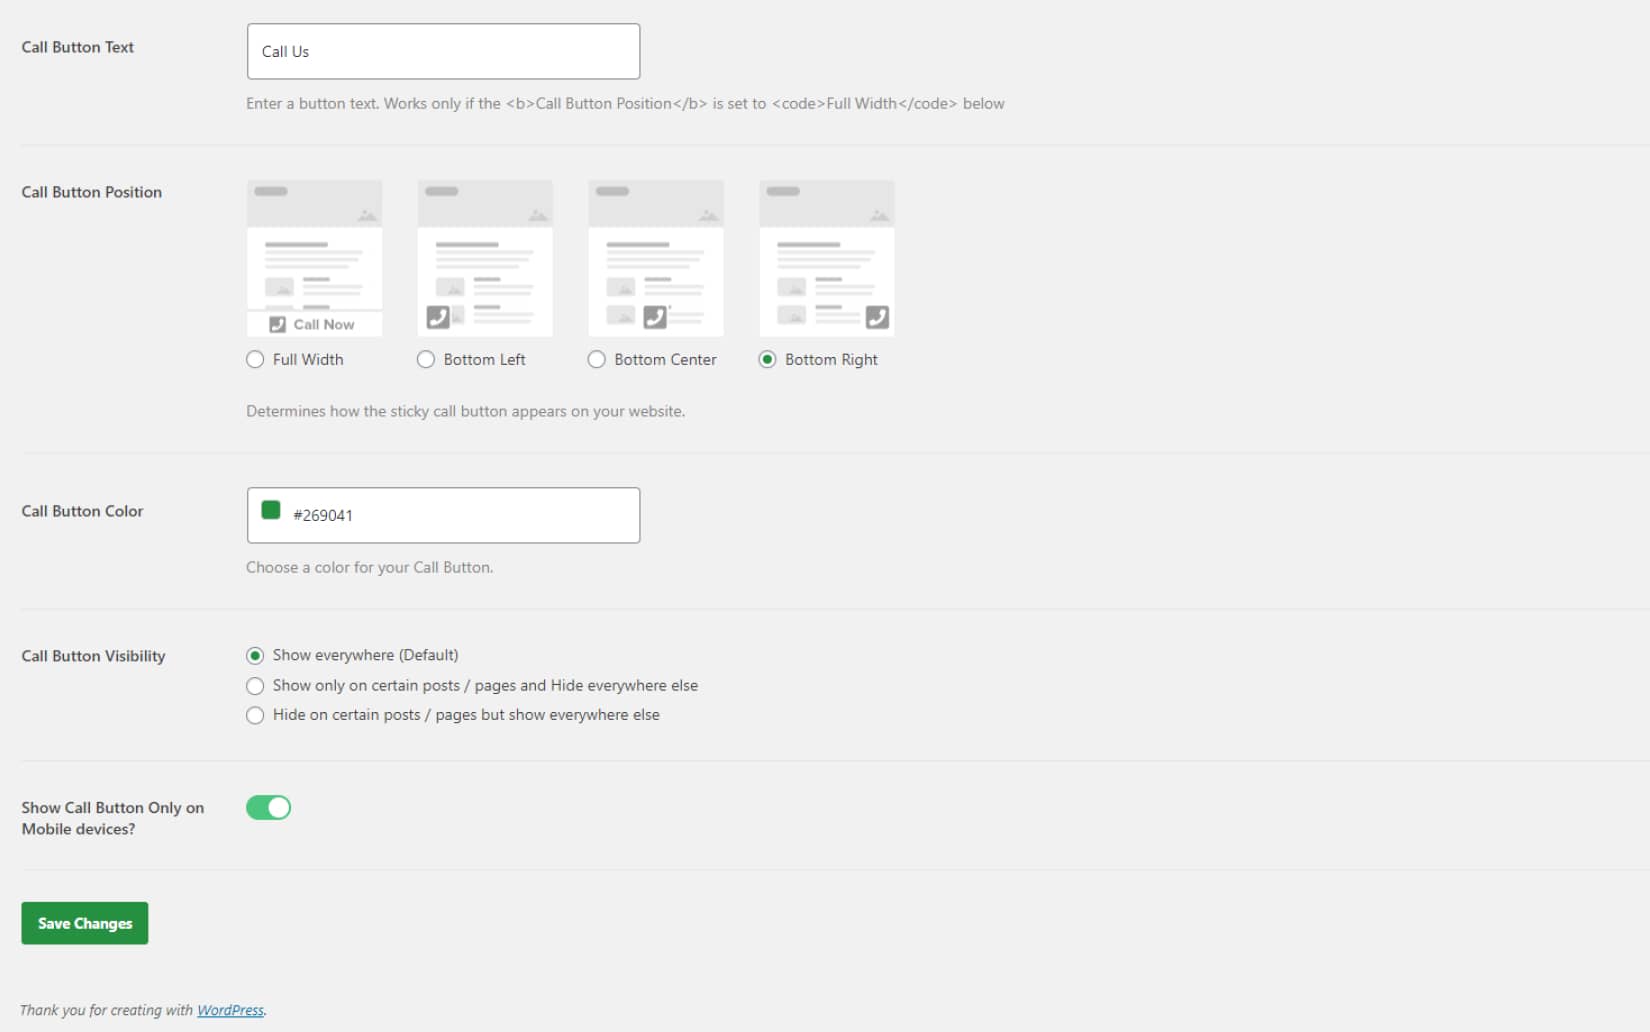
This next setting will allow you to add the call button text, obviously. Type in the text you want to be displayed next to the call button. Note that this setting will only be applicable if you select the Full-Width option in the next setting.
You can also change and configure how the click-to-call button will be positioned n the page. You can choose from Full Widht, Bottom Left, Bottom Center, or Bottom Right. This will determine how the sticky button will be displayed on the screen.
Next, you can configure the color of the button, choose one from the color spectrum and match the click-to-call button to your website’s aesthetic.
By default, the click-to-call button will be applied on all devices and all devices. To change that you can either choose to show/hide only on certain posts or pages, as well as switch the handle on for the clickable phone button to show only on mobile devices.
Once you have set everything and made all the arrangements necessary, scroll back to the top and switch the Call Now Button Status option on. Click on Save changes and you will be done. Your sticky click-to-call button will be displayed on your website.

Here’s how the button will look on your website. Now if you wish to add a static click-to-call button, on any of your pages you can do that via Gutenberg or via the classic Editor. Let’s revisit the WP Call Button settings and this time we will click on the Static tab.
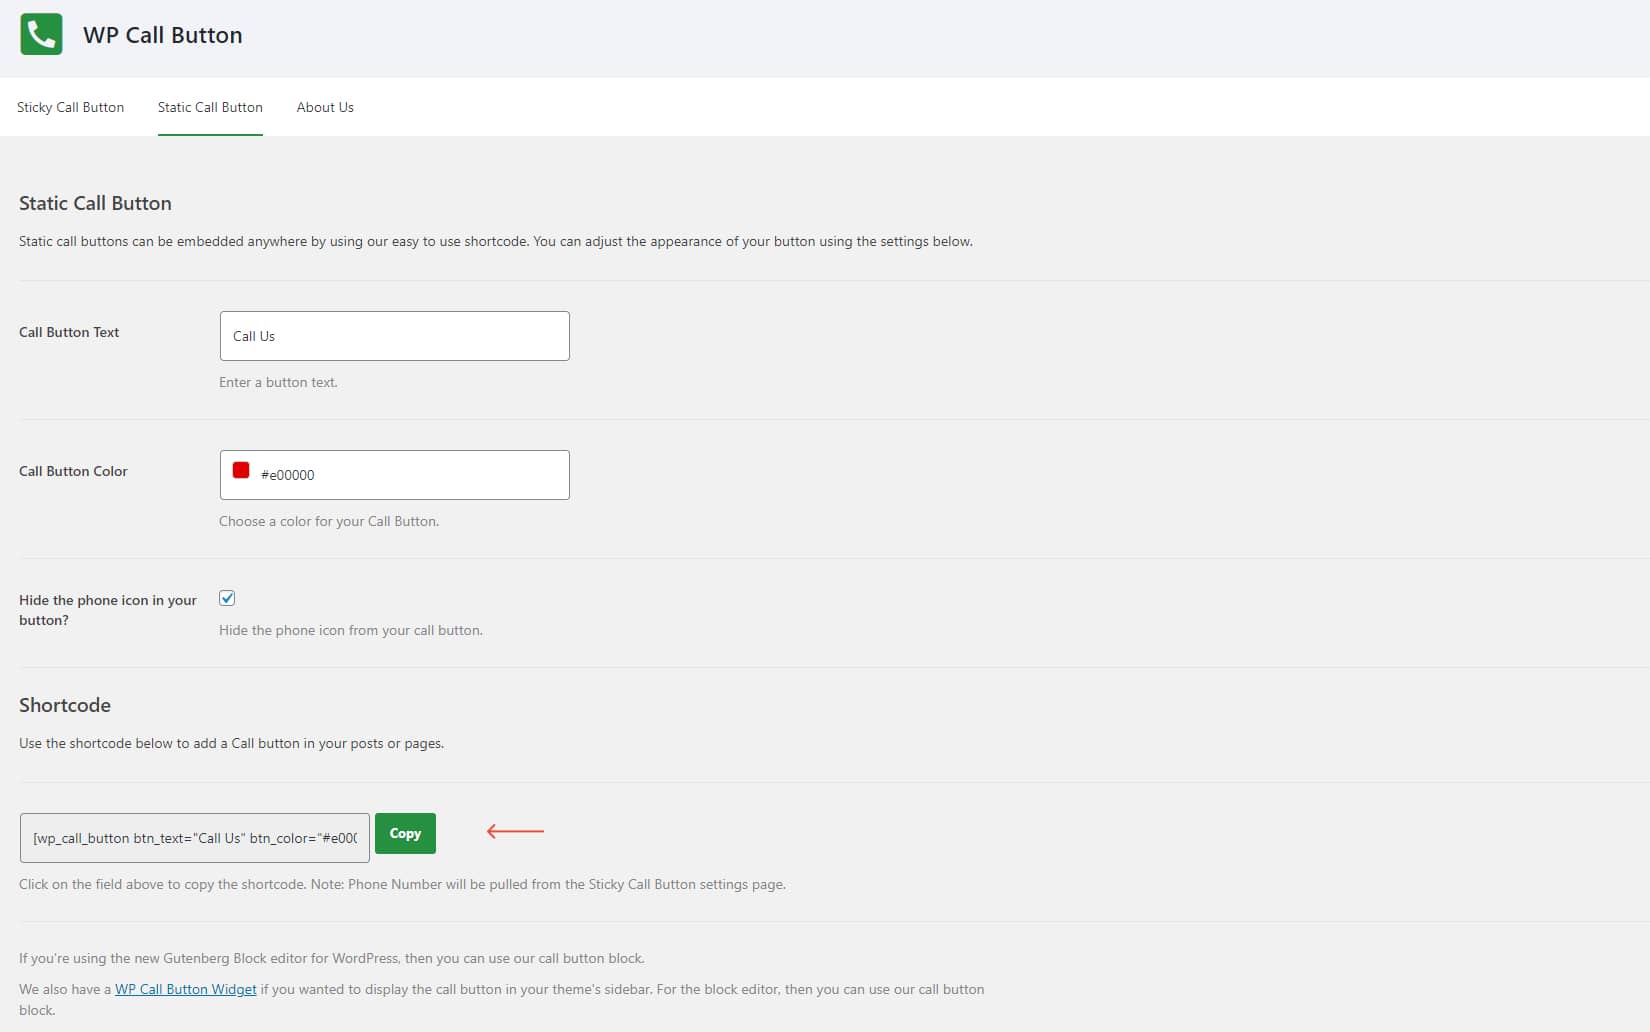
All the settings changes you have made on the Static tab like the button text or the button color will be applicable here as well. The telephone number will be extracted from the one you set out on the Static Call Button tab.
In order to have the click-to-call be static to a certain page or pages via the classic editor you will need to copy its shortcode which can be found here. And then paste the shortcode onto the page/post you wish to be displayed.
Next on edit the existing page you want to add the call now button or create a new page from scratch. If you are working with Gutenberg block, click on the plus icon to add a new block and choose WP Call Button from the list.
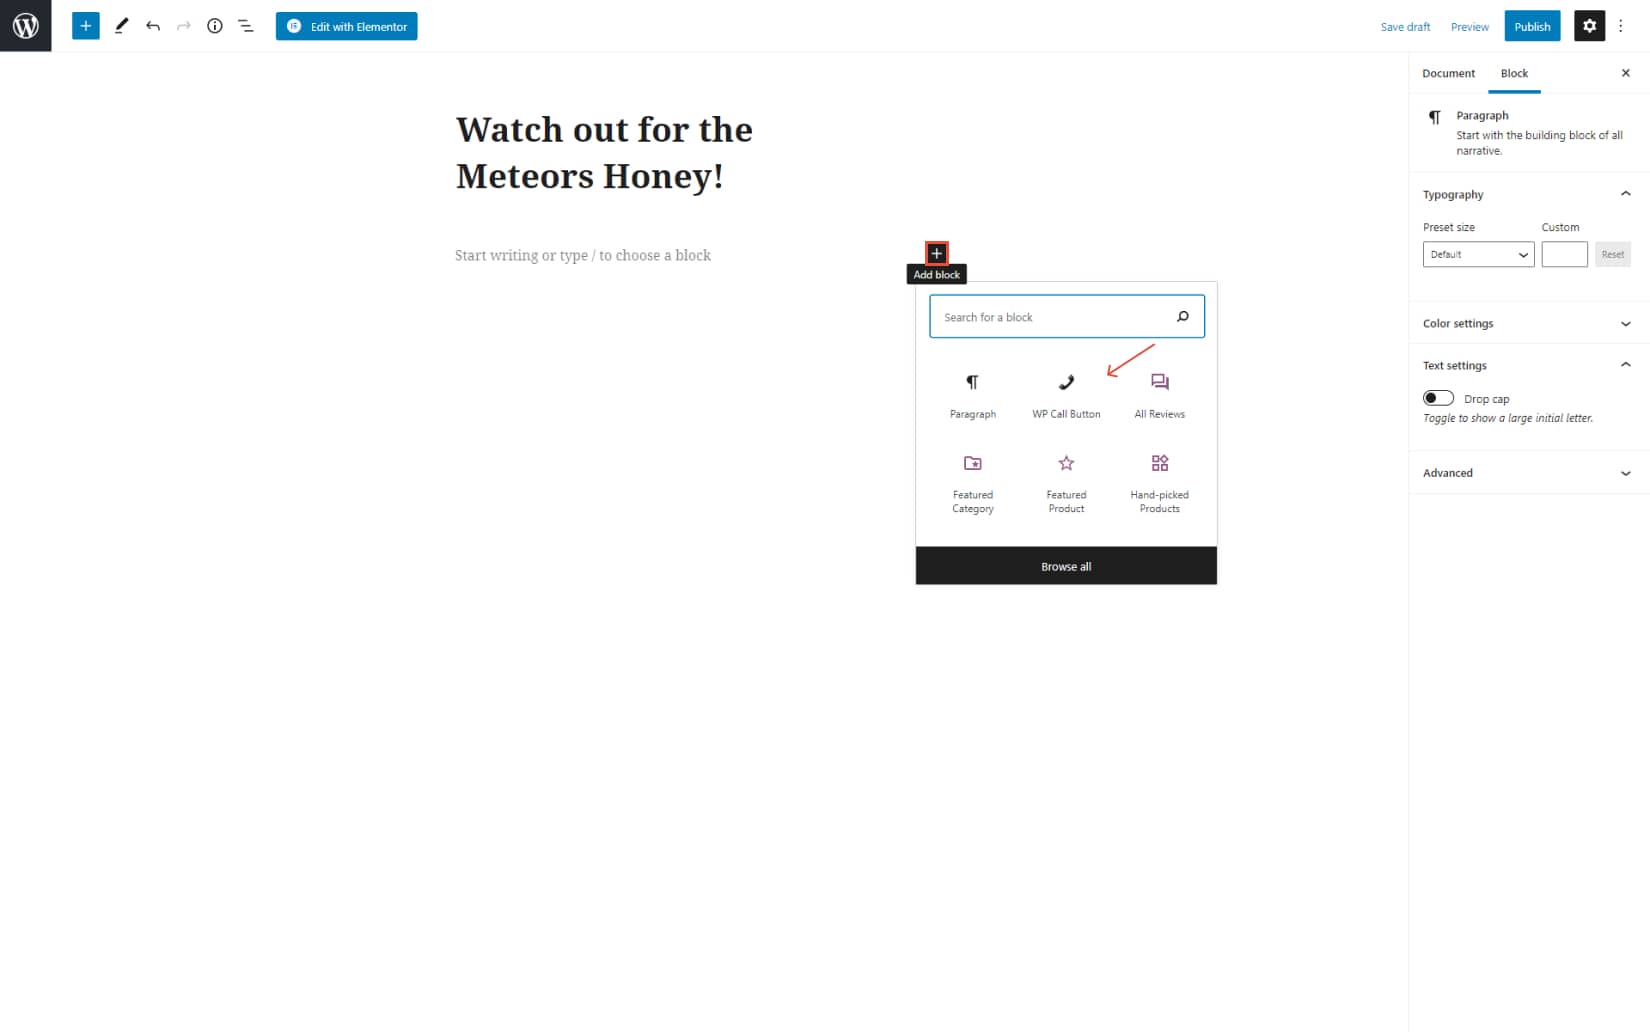
Once you click on the WP Call Button block you will have some more flexibility to design and display you call us button and be presented based on the aesthetic of your brand.
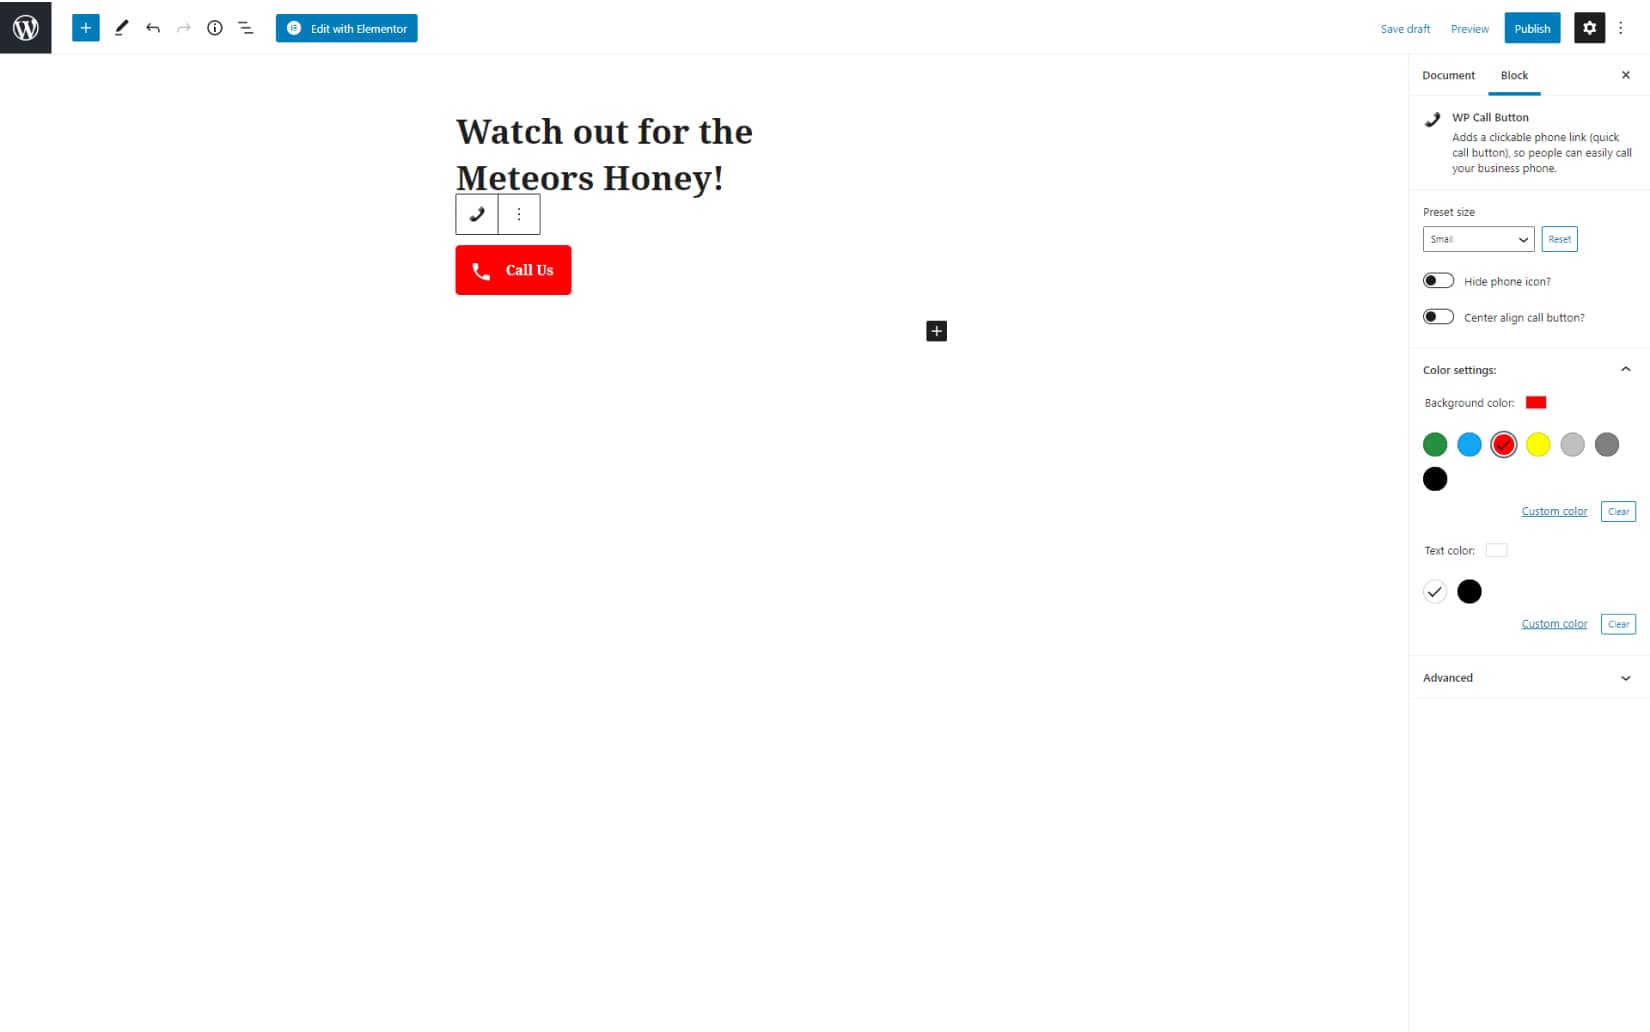
From the right panel you have some tools to customize the design of your click-to-call button from where you can change the font size as well as the color for both the text and the button. You can choose to ide the phone icon and leave the text only. Click on Publish and you will have your click-to call button displayed on your page.
Display the Click-to-Call button on the sidebar or on any widget area
As we mentioned you can also add a clickable telephone number to you sidebar or any widget area on your WordPress website, and it’s all way too simple to do. To start off go to Appearance> Widgets.
Next you will need to scroll down until you see the WP Call button widget and then drag it onto the sidebar. You can the edit the title, description, and if you click Show Advanced Settings you can further adjust the button like type in the text, or change the color for the button and the text. And lastly choose whether or not you want to show the mobile icon.
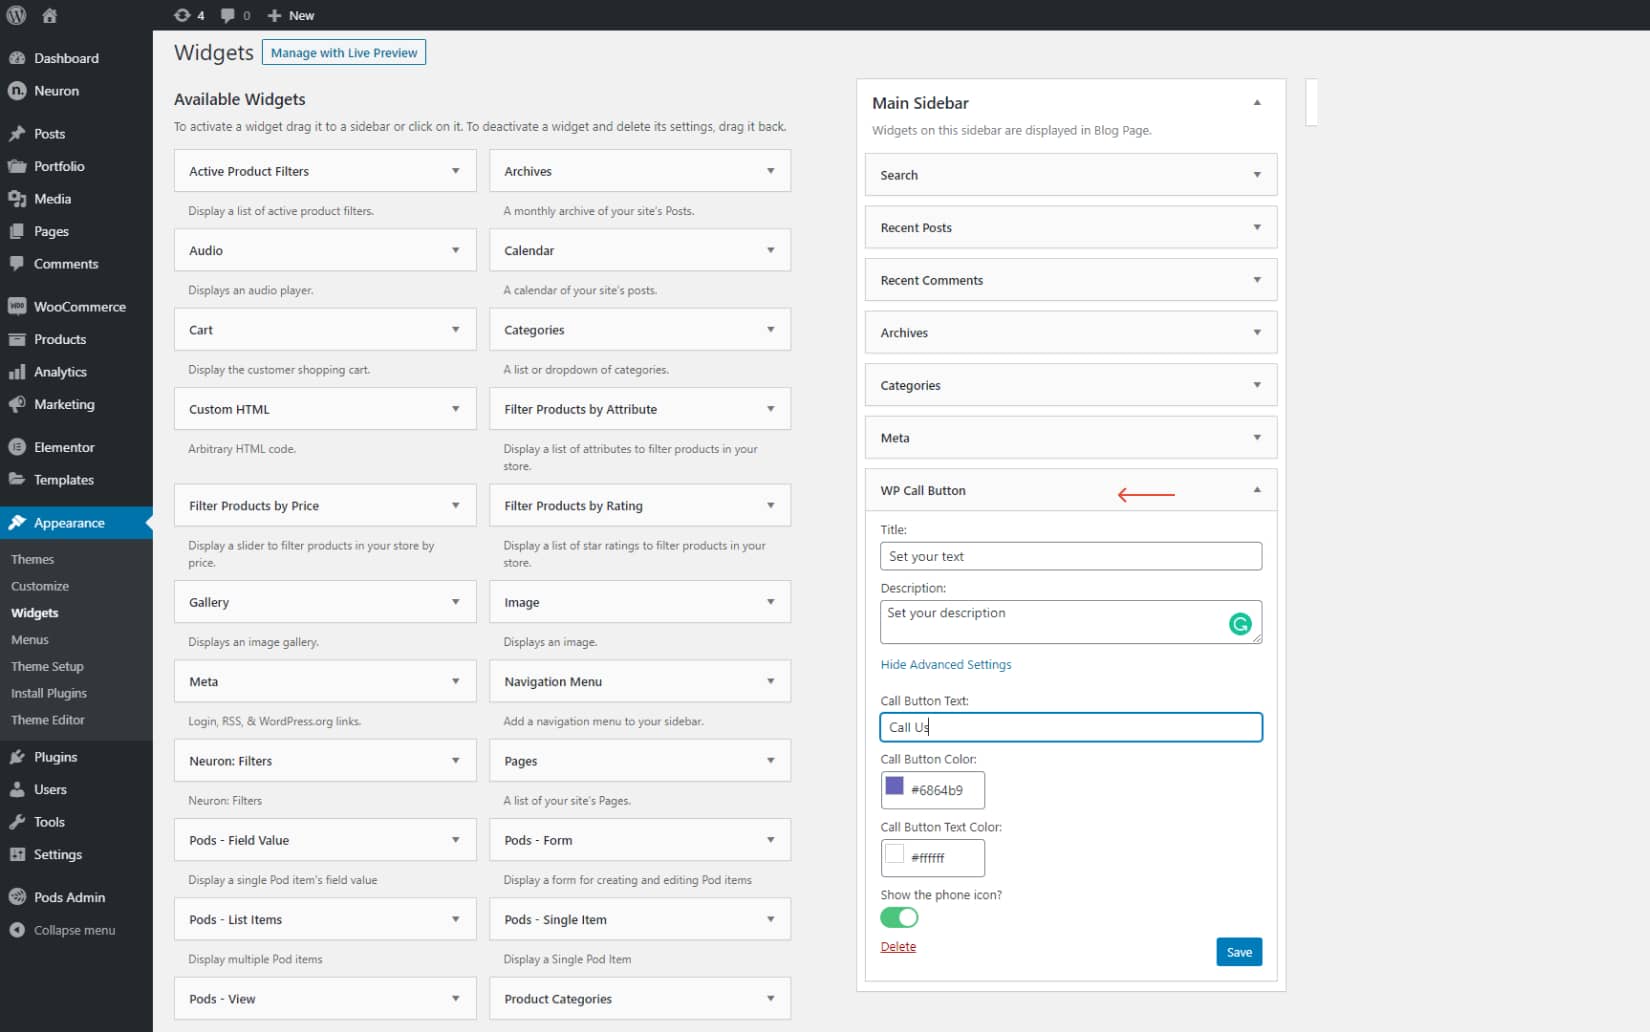
This plugin will give you much flexibility to add a clickable telephone number link or button on your page without having to touch a single line of code. Best feature of the WP Call Button plugin? It is 100% free in the WordPress repository.
How to add Click-to-Call buttons and CTAs on your website with Elementor
As a second approach we introduce to your the power of Elementor and Actions links. This feature allows you to easily connect with your site visitors, as well as analyze and track user data. Besides a click-to-call button you can connect to your users via WhatsApp, Waze, Google Calendar & more apps with just a few clicks.
Elementor is the ultimate drag and drop page builder that allows you build the most beautiful and successful websites as well as give you total design freedom to build any area on your website. All you need for this is to install Elementor. The free version of Elementor will give you much flexibility but you can alwasy extend the functionality using the pro version.
From WP Dashboard > Plugins > Add New, search for Elementor Website Builder and click on Install. Upon activation you can start building your website using all the advanced tools it provides. For a more detailed guide read the article on how to get started with Elementor.
If you wish to create a click-to-call button, from the left panel search for the button widget and drag it onto the page. You can stylize and design it as per your desire. Under Link, click on the dynamic icon.
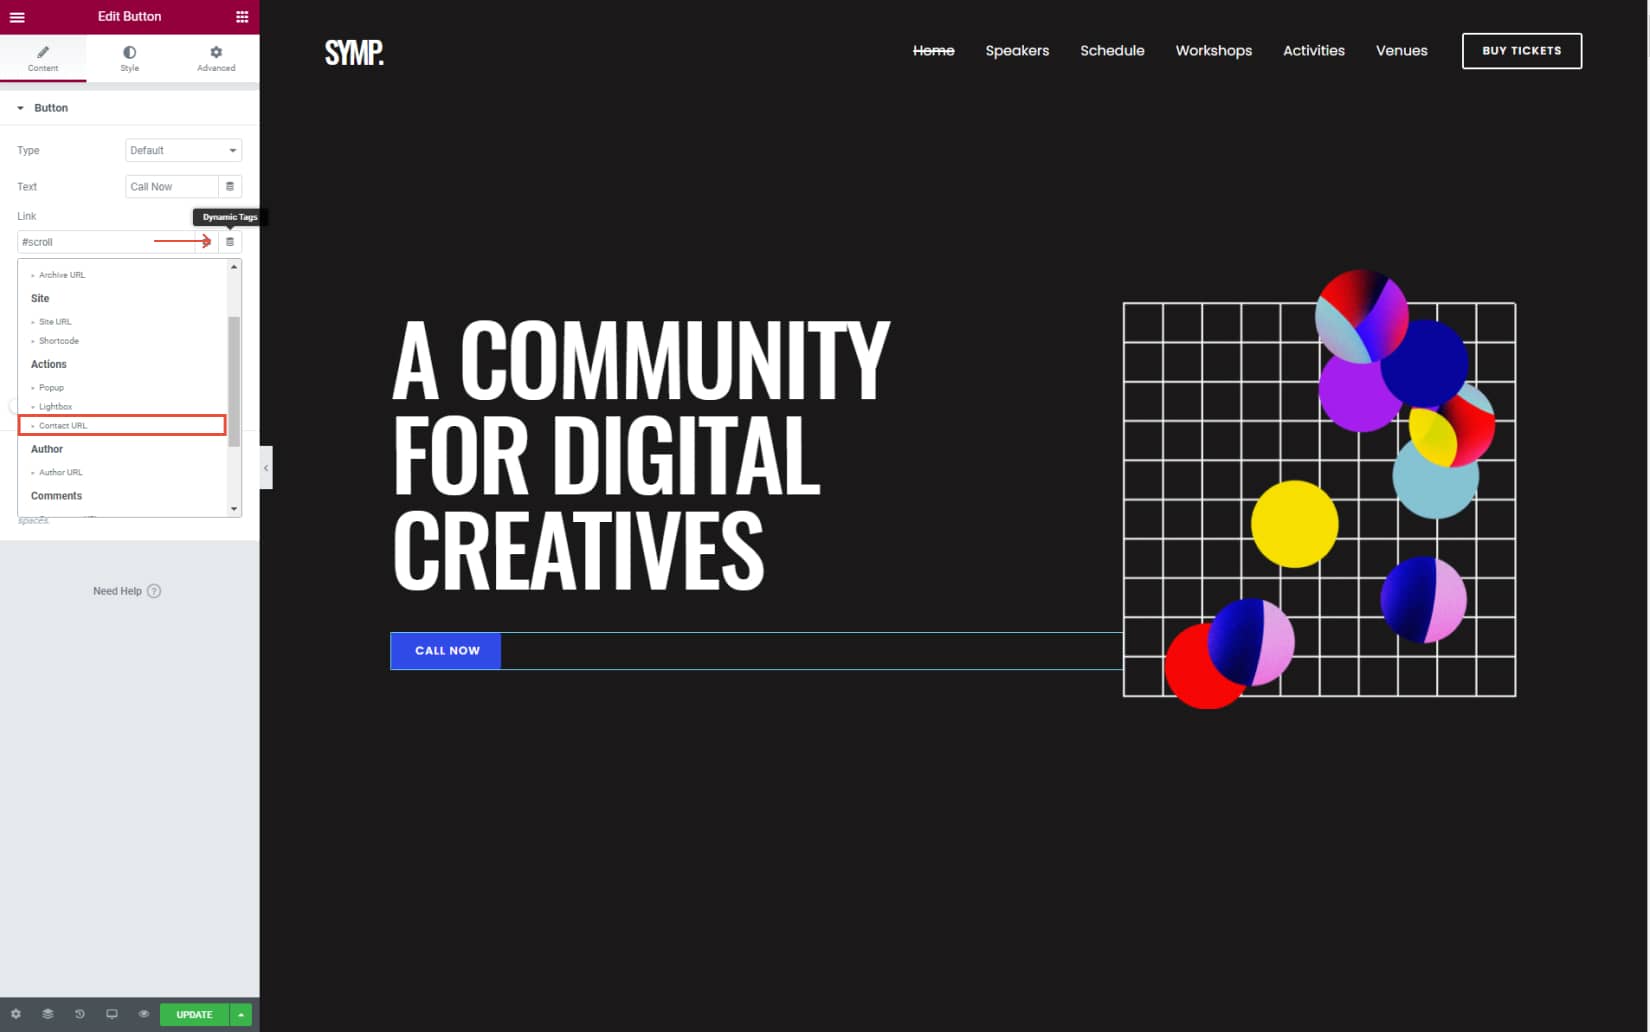
Once you’ve clicked on the dynamic icon, scroll down and under Actions choose Contact URL. Once you’re done with that find the wrench icon and click on it, under Type choose Tel, but nevertheless you can select from a wide range of options like Skype, Messenger, Viber, Waze WhatsApp, and more.
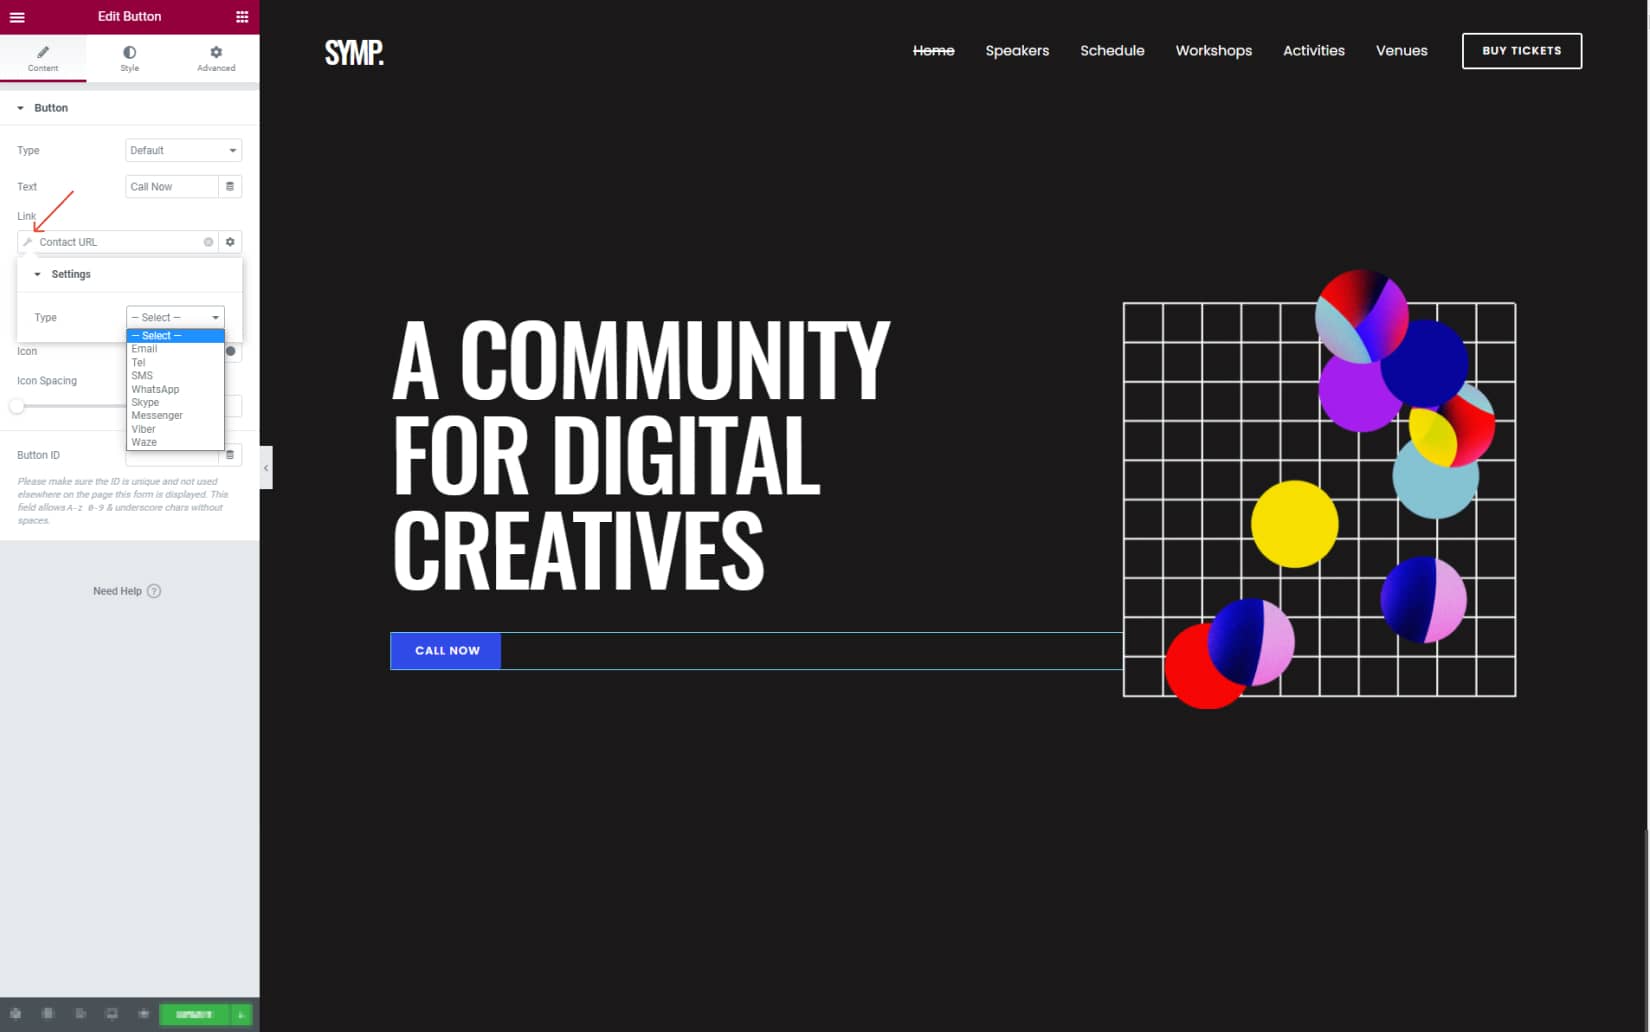
Once you select the Tel option from the dropdown menu, you will see the Number field that appears, there make sure to type in your telephone number and make the other arrangements needed in order to create a button that when clicked upon will immediately redirect to a call. Click on Publish, and your page will be live for everyone to see. Test the button to make sure you’ve set it up properly.
How to manually add a Click-to-Call button on your website?
Although the two first approaches are the best choice for every website owner as they provide all the most flexibility and are easy to work with, we are going to show you how to manually add a click-to-call button on your website that triggers a call once the users click upon it.
This is also an easy way to add clickable telephone numbers, but you will be limited in design. This option will use the HTML cope snippet that will trigger the phone links on mobiles, PCs and Mac. If a user clicks on the link from a Mac device then the link will open in FaceTime, while if they click on the link from a Windows the link will open on Skype.
Now let’s get to it. First open the page or post where you want the click-to-call button to be displayed, use an existing one or create a new page/post. If you are using the new WordPress editor, click on the plus sing to create a new block and choose an HTML block.
Next you will need to paste the following code on the HTML block.
Make sure to change the telephone number or the text according to your data.
If you wish to add an icon next to the telephone number manually. First from WP Dashboard > Media > Add New. Upload the image you want to display. Once you have uploaded the image click on the Edit link next to the image.
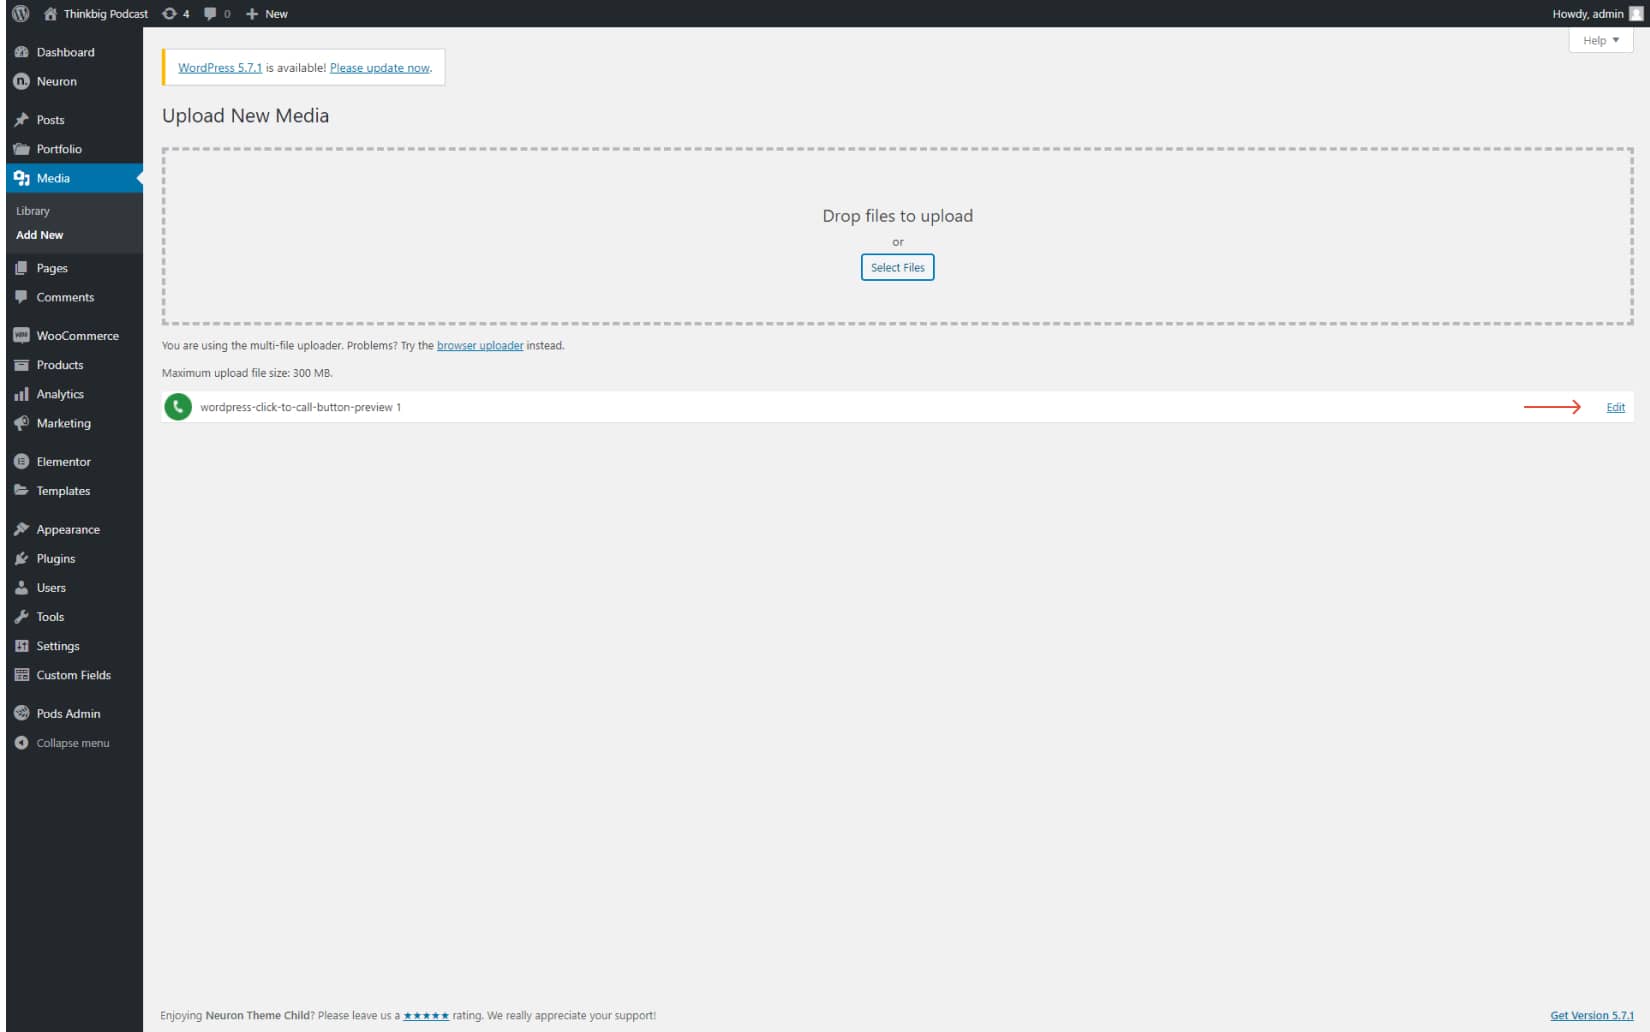
This will redirect you to the screen area where you can copy the URL link of the image. Following all the same steps as before, paste the following link on the HTML block.
Once you are finished you can visit your website and how the link works and whether or not you have made the proper setup.
How to add a Click-to-Call button on your navigation menu
This one too is quite simple and doesn’t require many steps. You can easily add a telephone number to your navigation menu and have users call you once they click on the link. To start off, go to WP Dashboard > Appearance > Menu.
From the Select a menu to edit option make sure you have the Navigation Menu selected and then you can proceed. Now. under Custom Links you will be able to add your telephone number. On the URL field, this is where you will need to type in your phone number, and under link text, type in the text for the link.
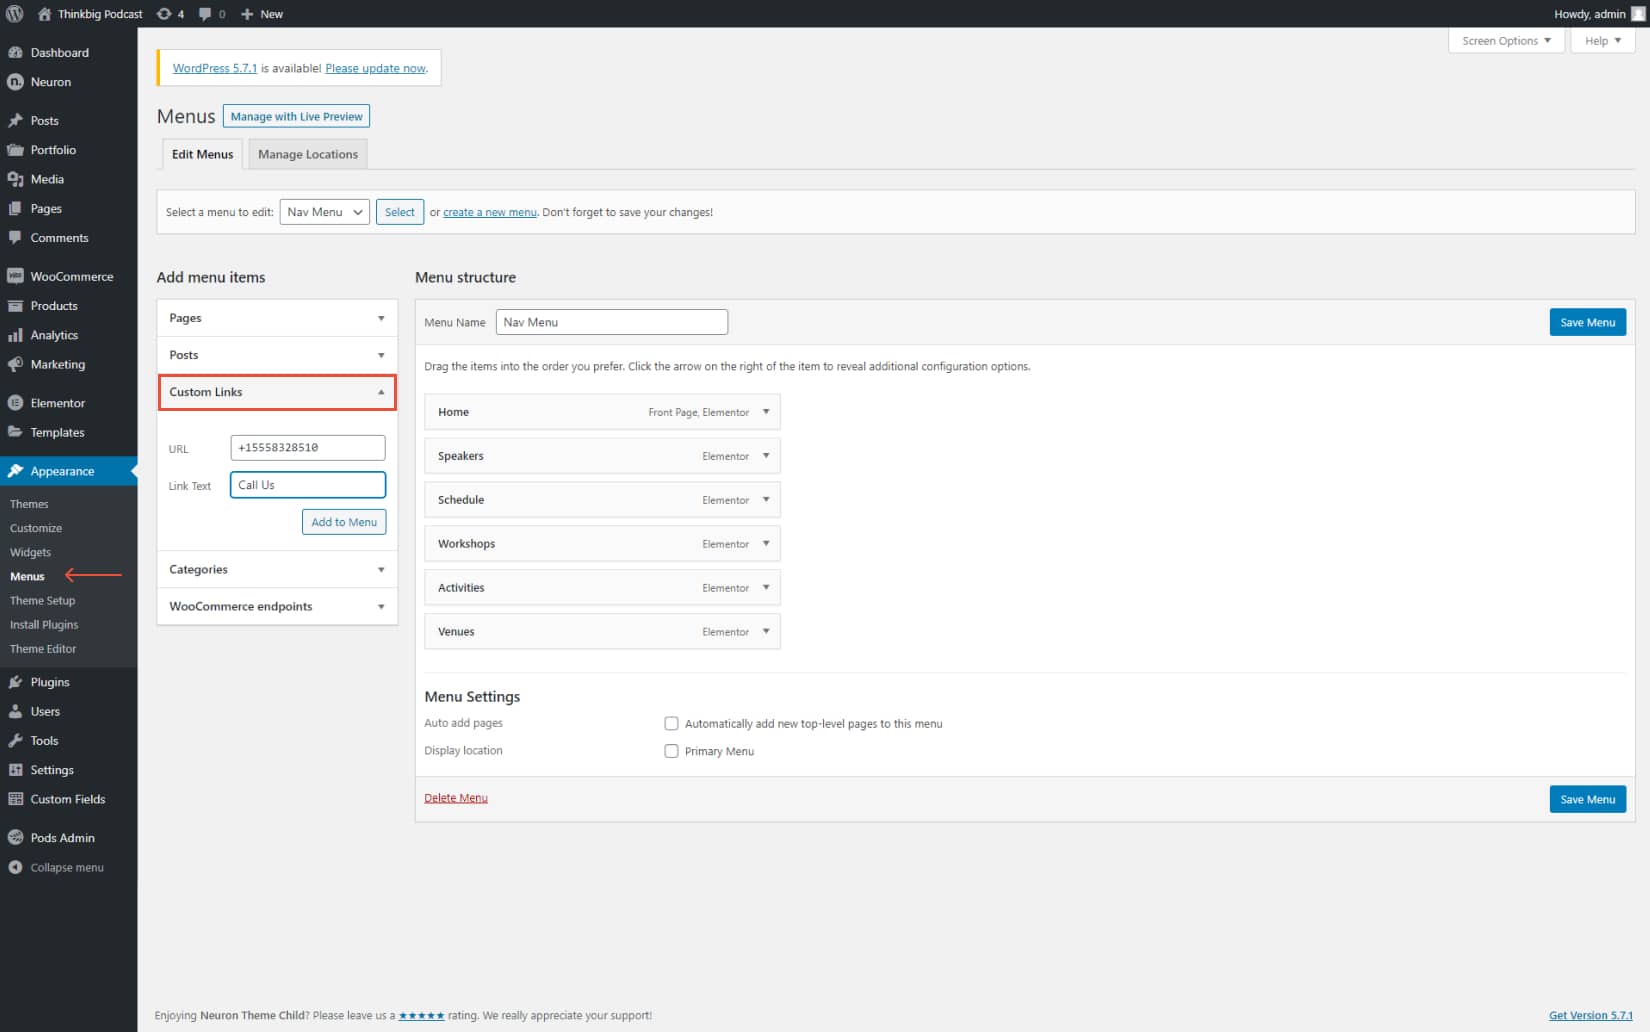
Click on Save Menu for the changes to take place, and now all you need to do is go to your page and see your navigation menu in action. It’s simple as this.
Final Thoughts
This concludes our article, and we hope it has been useful and informative for you. We have included all the methods on how to add clickable telephone number links on your website to make it easier for you to connect with your clients and users.
W have covered how to add click-to-call buttons with the help of a plugin that comes for free in the WordPress repository and offers a simple way of adding clickable telephone numbers. We have also covered how to create click-to-call links using the powerful features of Elementor that gives you total design and functionality freedom.
For those who do not want to bother with a plugin or use Elementor as their page builder, you can always turn to the manual approach that is quite simple and effective. Lastly, you can also add click-to-call links on your navigation menu using the power of the WordPress editor.


