How to use WebP images is the question of this article. Your website’s performance should be the main concern for every website owner as it accounts for a major share of the site’s success. Whether you are running a WordPress blog, online store, or online portfolio, images make up for about half of your site’s size, thus a decrease in the file sizes of your images will result in an exceptional improvement on your website.
We’ve always been introduced to the usual JPEG or PNG image formats, but now Google has released a different format for images that are said to reduce 25-34% in size compared to JPEG images and are 26% smaller than PNG images.
Page speed has always been a ranking factor among search engines, that is why you can not afford to have a slow website as you should impress and keep your users engaged within the very first seconds of their interaction with the website.
First of all, slow-loading websites have been proven to drive users off a website, especially mobile users, thus providing a bad user experience, which can also be a bad SEO practice to follow.
With the new Google Algorithm update, page speed has a new connotation of attention, meaning this ranking factor has always been important and will continue to be so in an ever-evolving, fast-pacing technological world. For this article, we will be showing you how to use WebP images in WordPress and how to convert existing images into WebP format.
What is WebP Image Format?
WebP is a new and quite impressive image format that uses a unique compression system that can display images at approximately two-thirds of the size of the images rendered in PNG or JPG format. WebP is a modern image format that aims to help you reduce the file size of your images without compromising their quality. Pretty sweet deal right.
WordPress by default does not include the support for WebP images, but we will be sharing how you can start uploading and how you can use WebP images to reduce the site’s load.
Every website that features images can sometimes have a hard time loading, or their loading time is slow. Images that are large in file size, and if there’s a lot of them, they can add to the website’s total size. Thus the larger the size, the harder it is for a website to load.
You can start to use WebP images on your website that will help you increase the performance of your website, especially if you are creating a blog website in WordPress. WebP image format can help improve the page loading time and it is best recommended to use alongside a caching plugin, a CDN, or other.
The main image formats traditionally used are
- JPEG – otherwise known as JPG, is a commonly used approach of lossy compression for digital images and can display high-quality images as they are widely used in photography. But these files are very large, and when compressed they can lose their quality.
- PNG – this type of format is best used for images with few details and support transparency. PNG images are best used for logos, interface screenshots, and more. Although they can display a smaller file size compared to JPEG images, they don’t work well for photographs.
- GIF- this type of format is excellent for animations, but not for static images WebP image format offers lossy and lossless compression for all images on the web.
As mentioned earlier they are significantly smaller in file size than the other respective image formant. Lossless WebP will also support transparency, but so does the lossy compression type when lossy RGB compression is acceptable.
WebP images will help you create smaller and high-quality images that also improve your site’s performance. See how you can use WebP images in WordPress for the ultimate flexibility.
Web Browsers that Support WebP Format
Most modern browsers and WordPress 5.8 + support the inclusion to use WebP images on your website. For WebP images to work, they need to be supported on the browser that your visitors are using, otherwise, it will show a broken image.
While on one hand WebP images have grown in popularity and use, it does not share the universal support of web browsers. Although it’s been around for quite some time now, WebP images are not supported in some web browsers. Some of the most popular web browsers that support WebP images include
- Chrome ( both desktop and mobile)
- Microsoft Edge
- Firefox (desktop and mobile)
- iOS and macOS Safari (macOS 11 Big Sur and later only)
- Opera (desktop and mobile)
- Safari
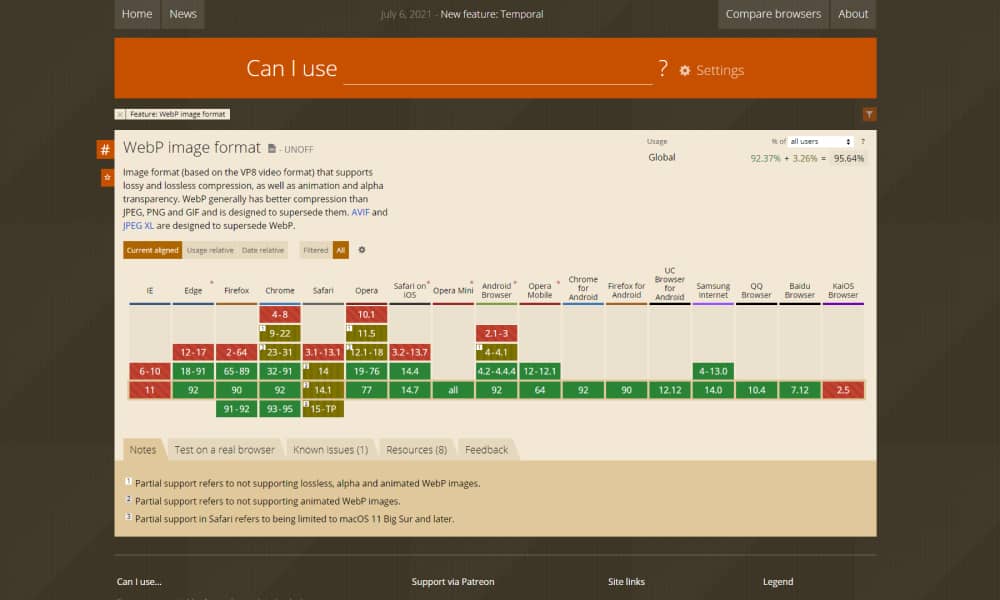
Internet Explorer does not support WebP as an image format, however, its usage has decreased to less than 1% of the internet usage. And when you account that 95% of the people who use the internet use the browsers that support the use of WebP images.
How to use WebP images in WordPress?
Starting with WordPress 5.8 you will be able to upload and use WebP images on your WordPress website just like you would normally upload JPEG, PNG, or GIFS formats. You can simply upload WebP images from the media library and include them in your content.
As of this WordPress update, you won’t need to install third-party plugins to upload and use WebP images on your website.
As we mentioned earlier in this article, 95% of visitors use a browser that supports the use of WebP images, but still, we have a 5% gap of users that needs to be closed, because if they visit your website from Internet Explorer, Safari users on older macOS or from other unsupported browsers, they won’t be able to see your images, which will result in bad user experience.
WordPress does not yet offer automatic conversion to WebP format. That is why in this article we will show you how to convert your existing images to a WebP format and how to use WebP images in WordPress. The plugins presented in this article will help you
- Converts the JPEG files to WebP and will display the WebP format to users from supported browsers
- Will show the original JPEG file format to visitors from unsupported browsers
This way you are sure to cover every user from any browser and provide them with the best user experience and still keep your website fast and well-performing.
Imagify is an amazing free WordPress plugin for optimizing your images and also to convert and use WebP images in WordPress seamlessly. Once you enable the plugin, it will automatically optimize all your media, including thumbnails, reducing the size of your website and increasing its performance and speed.
To get started, install the WordPress plugin from the repository. Imagify is a free and powerful plugin that‘s accessible to every WordPress user. Once installed, make sure you activate the plugin and you’ll be ready to go.
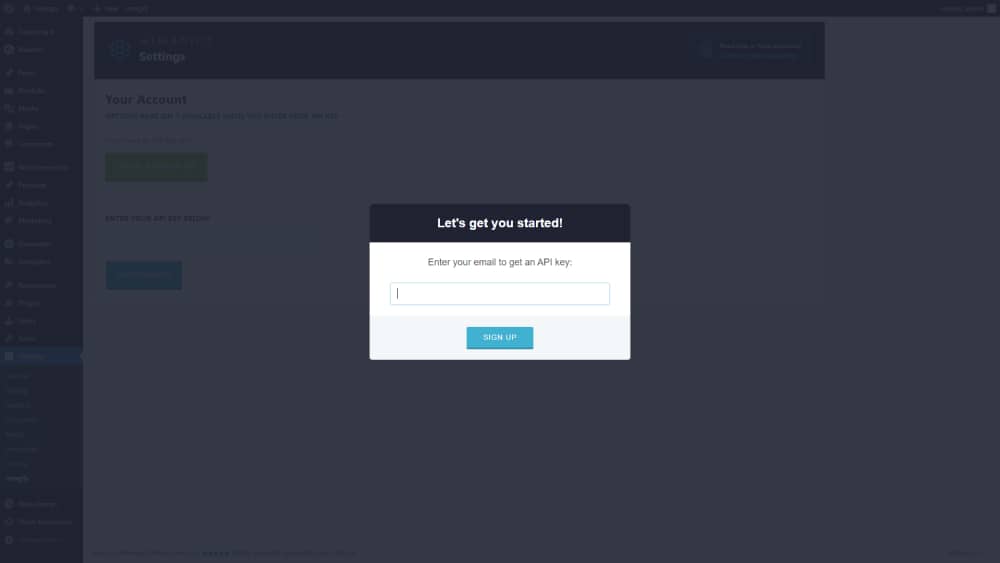
Upon activation, from the WordPress Dashboard go to Settings > Imagify. If it’s your first time using Imagify, you will need to create an API key, click on the green button that says “ Create a free API Key”.

Next, you will need to enter your email address to obtain the API Key for free. This is a simple procedure. Imagify will send you the API key on your email inbox, copy and paste it onto the designated field.
Scroll down to the Optimization field. The “Create WebP versions of images” is ON by default. You will need to also tick the “Display images in WebP format on the site” option like so.
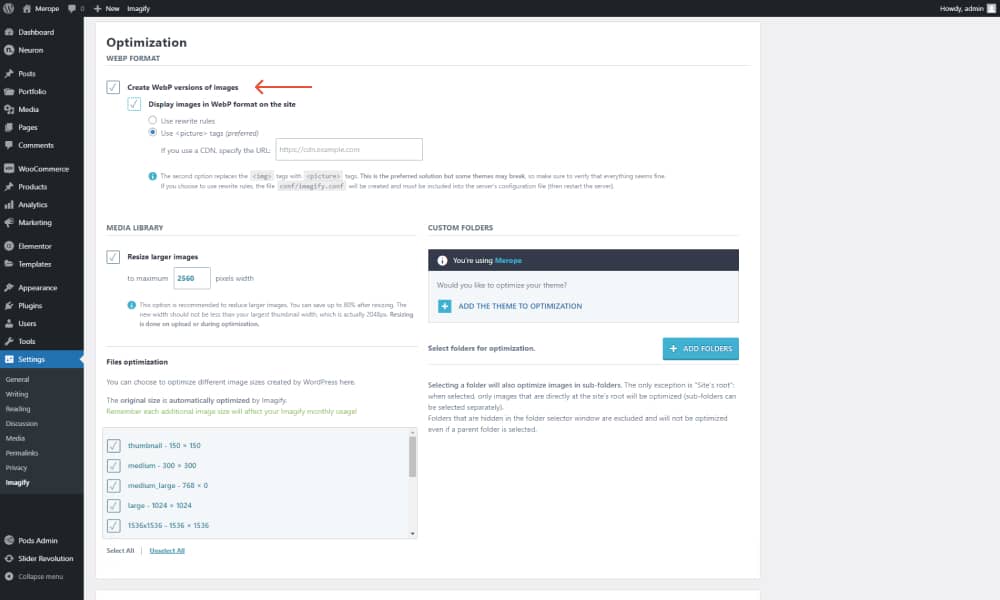
Below these options, you can choose the type of delivery mode you wish your images to be converted. The “Use rewrite rules” approach uses the .htacess method, and the second approach uses the <picture> tag method.
The first method, the.htaccess approach is faster and will bulk convert your JPEG and PNG images to WebP, while the second approach is best to choose when you are using a CDN service. Choose the method that best suits your website to use WebP images on your site. Once done click on the Save & Go to Bulk Optimizer button.
This will redirect you to the Bulk Optimization page where you can see how much size you’ve saved up. This will take time depending on the load size of your website.
You can test your images to see if they have been converted to the WebP format. Visit a page that contains images, right-click on the image and choose Open in a New Tab. In the URL field, you can see the .webp extensions, which means your images have been successfully converted.
Optimole is another amazing image optimization WordPress plugin that offers a similar yet different approach. Optimole helps you optimize all your images and media included on your WordPress website. It provides an automated solution and a one-click setup and a minimal footprint. Different from Imagify. Optimole offers
- Automation optimization of your images and serves them through its CDN powered by Amazon CloudFront
- It provides real-time adaptive images and serves the images optimized depending on the screen the user is using while visiting your website.
First, you will need to install and activate the plugin from the WordPress repository. You can find it under Media > Optimole from the WordPress Dashboard. You will need to provide an email address and they will provide you with the API Key.
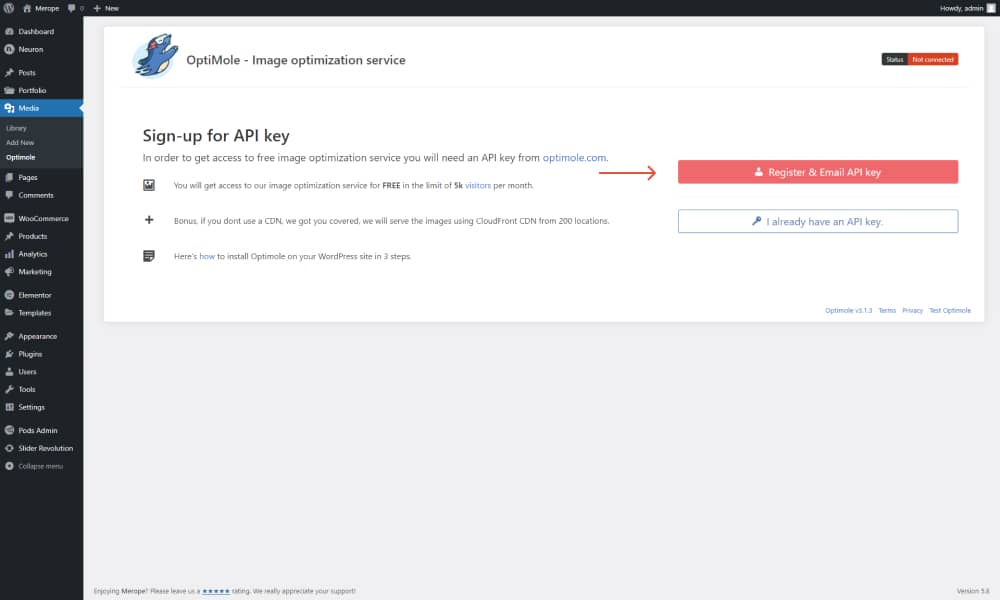
Once everything is set into place, wait until Optimole connects your website. From here everything else is done automatically. By default, Optimole will use WebP images and display them to every user that visits your website from a compatible browser with this image format.
You won’t be needing to tweak any settings. Also, the main image optimization features are ON by default like scale the images and lazy loading. If you need to further tweak the settings in Optimole, go to Settings, and there you will have all the options available for you.
Final Thoughts
In this article, we’ve shared our knowledge on how to use WebP images in WordPress, how to convert your existing JPEG or PNG images to WebP, all done automatically with the help of a plugin.
We’ve listed two of the best free plugin services for the job that makes managing your site’s media a lot easier with the automated process.
Learning how to use WebP images and their benefits will have you improving your site’s performance at a noticeable rate. Because they are designed to take up as little space as possible and provide the best quality, this makes them perfect to use WebP images on your website.
95% of the users visit your website through a compatible browser, and in case they are in the minority of the 5%, with the help of the plugins we introduced they will still be displayed the JPEG or PNG version of that image, ensuring your coverage on all fronts.
